Thursday 30 April 2015

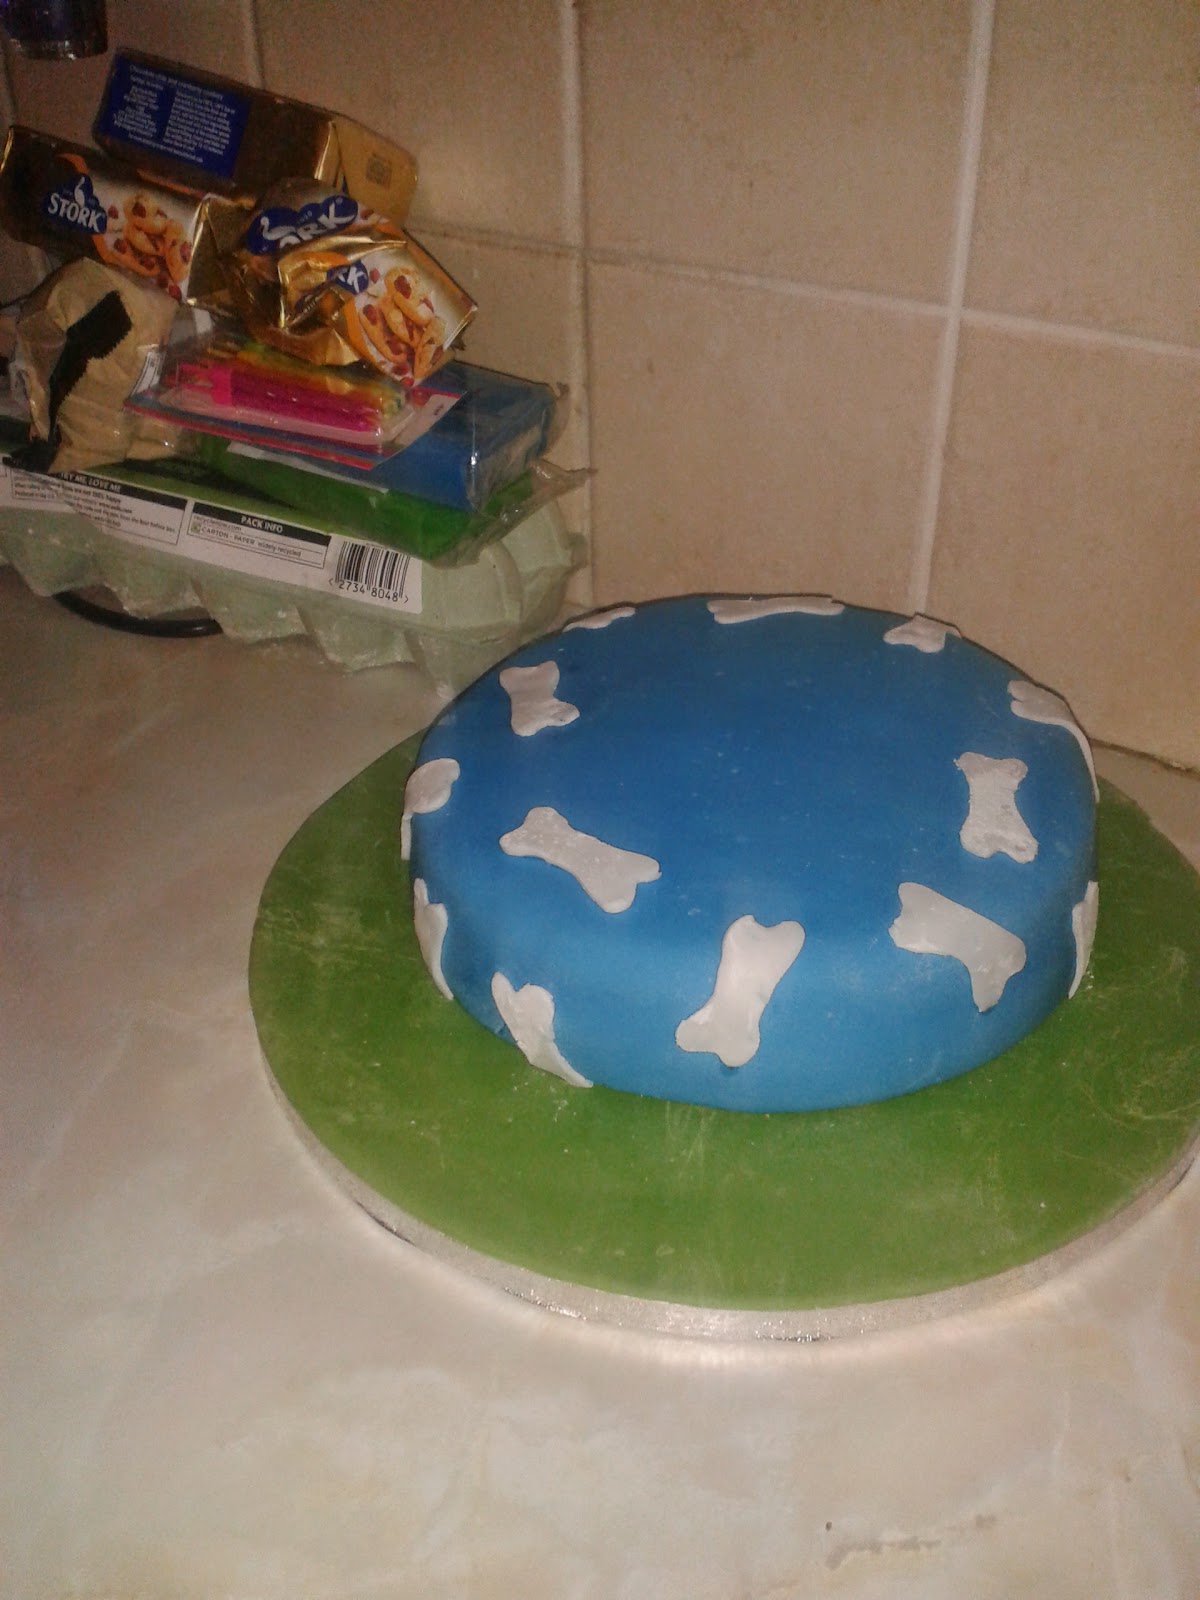
Tommy's 4th birthday cake

It is one of my life's major aims to become a good cook/baker. I'm very very slowly getting there - as they say, practice makes perfect and practising is what I've been doing a lot of. Baking and cooking is something I have always really enjoyed. It's the only activity I really do that could qualify as 'me' time. Being a teacher, I have always had very little free time to pursue any of my hobbies, baking included so I've enjoyed being on maternity leave and having a little bit of time to devote to it.

I would really love, in particular, to master the art of cake-baking and decorating. For Tommy's 1st birthday, I ordered him a cake. It was beautiful and something I could have never attempted to make myself. When it came to his 2nd birthday, I decided to try and make my own. I have made his birthday cakes ever since and will continue to do so. My first attempt was extremely arduous and stressful; it took more than a whole day in total, there were plenty of tears, the cake wasn't particularly appetising and the finished cake was very disappointing. I was ready to throw in the towel at that point. Getting someone to make me a cake would be so much easier. I perhaps wasn't cut out for it myself. I didn't have the equipment, the skills, the knowledge, the talent necessary to do it. I did have the passion and enthusiasm though.

When it came to Tommy's 2nd and 3rd birthdays, I decided to have another go at making cakes myself - this time, buying more professional equipment and doing a little more research into techniques, ingredients and the tools needed for certain aspects of cake-decorating. This year, though, I feel I'm finally getting somewhere with it for the first time.

The first mistake I've made every year is to ask Tommy what kind of cake he would like. He would then peruse images of cakes on the Internet and inevitably pick the most intricate, extravagant and difficult-to-make design, which I would then (hopelessly) try to recreate. This year was no different. Tommy initially requested a 'Dusty' from Planes cake in the shape of an aeroplane. I explained this would be a step too far for me and so we finally settled on a round Scooby Doo cake. This would be more within my technical ability. Just about.

I've always used a Madeira cake recipe for birthday cakes. Madeira is a good choice for novely cakes, as it has a crumb structure that makes it easy to shape and cut without falling apart. But I always found the cake too dry and bland so I opted for a moist chocolate cake instead this year.

When I'm making chcolate cake, I ALWAYS use this recipe. It's the most easy recipe you'll ever use and it's guaranteed to make the most deliciously-moist and scrummy chocolate cake you'll ever taste. Trust me, you just HAVE to try it! You will not be disappointed.

Ingredients:
225g plain flour
350g caster sugar
85g Cocoa powder
1 1/2 tsp baking powder
1 1/2 tsp bicarbonate of soda
2 free-range eggs
250ml milk
125ml vegetable oil
2tsp vanilla extract
250ml boiling water

Method:
1. Preheat the oven to 180 degrees/350degrees F/gas mark 4 and grease/line two 20cm/8 inch sandwich tins.
2. Place all of the cake ingredients, except the boiling water, into a large bowl. Using a wooden spoon or electric mixer, beat the mixture until smooth and well-combined.
3. Add the boiling water to the mixture, a little at the time, until smooth.
4. Divide the mixture between the two sandwich tins and bake in the oven for 25-35 minutes.
5. Remove from the oven and leave to cool completely before icing.
That's it! REALLY! And it turns out brilliantly every time.

For the filling, I melt 50g of good quality dark chocolate in a pan and allow it to cool completely. I beat 100g unsalted butter and add 200g of icing sugar, a teaspoon of vanilla extract and the cooled chocolate. If the mixture is a little stiff, I add a little splash of milk to loosen it. Before icing a cake, I add a layer of buttercream icing to the middle, top and sides of it.

Tommy's Scooby Doo cake was relatively simple. I covered a cake drum in green icing and the cake in blue. Then I added white fondant bones to the sides and top of the cake.

 
I cut out a Scooby Doo design in brown fondant using a template and then added fondant details on top. To make the design stand out I then outlined it with black writing icing.


To finish the cake, I added some lettering to the cake drum with some funky letter Tappits. I was pleased with the overall finish of the cake and it tasted delicious too. By all means, it's not perfect but it's probably my best birthday cake attempt to date. At least things are going in the right direction! This month, I new cake shop has opened up in my town and the good news is that they are advertising cake-decorating classes. So guess who's got their name down? I WILL eventually have this birthday/celebration cake-making thing sussed. It may not be until Tommy reaches his 21st birthday but one day it WILL be happening! In the meantime, I'll keep you posted on all my cake-making and baking exploits.

Birthday party photo collage

If I'm honest, we weren't really intending to have a family birthday party for Tommy this year (which sounds awful!) but with us being away for Tommy's actual birthday, it didn't seem right somehow to be celebrating either a week before or after the big day itself. However, because Tommy's birthday has always fallen on a weekday and the fact my parents live a few hours away, we've usually ended up having a family get together either the weekend before or after it anyway, so it only seemed right that we did the same this year.

I usually go completely overboard when it comes to Tommy's birthday party. If you follow me on Instagram and go back a year in square pictures, you'll see Tommy's 3rd birthday cake - all 3 tiers of it. I made 3 gigantic tiers of cake. It took me days. My blood, sweat and tears went into it (metaphorically-speaking of course). I think 16 or so people came to Tommy's birthday party and the cake would have fed 50 or so. I literally begged people to take a slice or two home. Most of it ended up in the staffroom at my school. From that moment on, I vowed never to go over the top again in terms of food for parties. What I did need to do, however, was up my game in terms of my hostess skills.

I'll be writing a post on Tommy's 4th birthday cake soon (if I make a half-decent job of it, that is!) but I thought I'd share with you a simple idea you might use for a children's birthday party - a photo collage made up of photos from each year of your child's life.

Luckily, this was pretty straight forward for us, as I am VERY snap-happy, own a smartphone that I take everywhere and make sure I use my FreePrints every single month. I've also been uncharacteristically organised and super-geeky about organizing my photos, documenting where/when they were taken and how old each child was at the time. I just figure it will be lovely to look back on one day and help stimulate my memory when I'm old and wrinkly - it's already not the best!


It was lovely to look back on photos of when Tommy was tiny, to see how much he'd grown and changed. Since Isla was born, Tommy has been asking a lot about what he was like as a baby, what we thought about him, whether we remember when he was tiny and so it's been lovely to go through his old baby photos with him. It's easy for older siblings to feel a bit pushed out when a new baby arrives and talking about them when they were a baby and getting out the old photo albums can help to put them at ease and remind them how special and loved they are.

We chose our favourite photographs and then stuck them on our door in order from youngest to oldest. I intended to organise them in the shape of a number 4 originally, but the space provided by our door was too small. Next year I might organise them on a large wall instead to enable me to do this. All our guests really enjoyed looking at the photos and it brought back so many happy memories for us as well as them.

Wednesday 15 April 2015

Keeping a toddler occupied on an aeroplane

It can be such a daunting task to pack for young children when you are going on holiday, regardless of whether it's for a few weeks or just a couple of days. Babies and toddlers seem to need so much stuff and it's difficult to get the balance right between packing too much or too little. When packing for a holiday, we tend to pack in order of importance; we start with absolute necessities and work from there and leave things we will probably be able to buy when we reach our destination (like nappies, wipes etc.) until last. Clothes are an obvious must and to minimise the amount we need to take, we tend to pack items that will mix and match. I also try to plan the children's outfits as much as possible, so that I pack only what we will need rather than just shoving a load of their clothes into a suitcase.

Then there's the issue of keeping your child occupied during the journey to the holiday destination. We're travelling to Disneyland on Tuesday (YAY!), so we'll have 2hr car journey, followed by a long wait at the airport, followed by a flight and then a transfer to our hotel. There's always 'I spy' but if your car journeys are anything like ours, you'll find that it keeps your children occupied for all of 5 minutes and then they'll be the usual "Are we there yet?" and "How much further is it?" 1000 times over.

This will be Tommy (and Isla's) first trip on an aeroplane and so we're not sure how they'll feel about being in the air. Luckily, we're breaking them in gently with a short flight (approximately 1 and 1/2 hours I think), so if they don't like it, it won't be like they'll have to endure it for a long time and hopefully we'll have enough tricks up our sleeves to keep them entertained. It's a tricky task with Tommy at the moment because he currently has an attention span equivalent to that of a gnat!

I am currently working on ways of occupying Tommy on the car journey that don't involve reading/ writing (a precautionary measure for avoiding potential travel sickness) so I may write a related post on that if I get round to it (this is probably not very likely, considering all the preparation and packing I need to do, but you never know...) We've got both flights pretty much sussed though, so I thought I'd share with you our ideas for keeping Tommy busy.

With it being Tommy's first flight, I thought we try and make it as exciting as possible for him. Despite me being quite a nervous flyer, I don't want Tommy to pick up on this and become this way himself. I want him to thoroughly enjoy the experience. In order to help with this, I've bought him a new backpack for all of his in-flight goodies and entertainment.

We've thought very carefully about what to put in his backpack for the flight. Anything you intend to take onboard a flight, either for a child or yourself needs to be lightweight and portable, so we took this into account when packing.

The obvious choice for us was a small collection of busy bags. If you don't know what a busy bag is, it's a small bag with a little activity inside for your child to complete, either independently or with support from an adult. We use busy bags regularly when we're out and about, when I know we're going somewhere where there'll be a lot of waiting around, when we're going on a journey or when we're away on holiday. I keep a couple handy in my bag at all times.

The list of possibilities for busy bags is endless - just run a search on Pinterest and an overwhelming amount of ideas will come up. Here are the busy bags we chose to include in Tommy's flight bag:

Bendy straws and felt squares with holes for a bit of fine-motor practise
 
A felt Mr/Mrs Potato Head with two boards for sticking them onto
 
Foam lacing cards and coloured laces
 
Numbered lego blocks for building/number counting/ordering/addition and subtraction
 
Fine-motor pattern copying cards - just laminated cards that can be written on, wiped clean and reused
 
Foam noughts and crosses set, sliding puzzles and marble mazes (found on eBay/Amazon)
 
A set of dry-wipe letter formation practise cards (Early Learning Centre)
 
As well as these, we've put in some pocket books - we're enjoying Jane Hissey books at the moment.
 
 
 Also in Tommy's flight bag, we've put a pack of cards and then a cardholder for little hands.
 
 
We love nothing better in our house than to sit doing a jigsaw, but jigsaws are usually big, bulky items that aren't really suitable for taking on holiday. So we've placed two of Tommy's jigsaws in sealable clear plastic bags. I chose these two in particular because they have lots of small pieces, so they should keep him busy for a while!


 And that's the lot, minus a few snacks! We'll put half of these in Tommy's bag for the flight there and the other half will be put in on the way home. That way, he'll have something new to do for each journey. I'm hoping they'll be enough to keep Tommy entertained/distracted if he doesn't like flying. Failing that, we can always resort to the TV. I'll let you know how successful it is. In the meantime, I'd love to hear how you keep your children entertained during long car/aeroplane journeys. Do you have any tips as to how/what you pack?  


Minion Eggs

So, I got ridiculously into Easter this year. So much so that I went completely overboard when it came to buying Eastery paraphernalia for the house, Easter gifts for the children's Easter baskets, Easter eggs/chocolate (even though I was adamant the children would NOT be getting eggs from us this year) and Easter egg hunt-related things. At the last count, I think I bought a total of 60 plastic eggs and, looking back on this now in hindsight, this was a completely ridiculous overestimation of the number I needed, particularly considering the fact we weren't intending on hosting an Easter egg hunt with lots of children and our youngest child wasn't old enough to 'hunt' eggs or eat/enjoy the treasures inside. So, let me repeat - 60, yes that's 60 plastic eggs for a one-person treasure hunt. Major miscalculation. Big. Fat. Oops. Oh well. At least they're both cheap, re-usable and useful for a variety of purposes. I do love these little plastic eggs - they're so bright and colourful and I'll be sure to use them regularly in our play and learning.

We had a particularly wet bank holiday weekend (aren't they all?!) so I searched Pinterest for a craft activity we could do that wouldn't involve a trip to the shops to buy craft supplies and I stumbled upon this.


These are so quick and easy to make and a must for any Minion/Despicable Me fan. All you need to make them is black tape, googly eyes, yellow and blue plastic eggs and a sharpie/thin permanent marker.

Start by pushing together half a yellow egg with half a blue egg (it works best if the blue part is the smaller part). Then cut a stripe of tape in half lengthways and carefully wind it halfway up on the yellow part of the egg. Stick googly eyes onto the tape (we used self-adhesive eyes to make it easer). Then add detail (mouths, dungarees, hair, eyebrows etc.) with the sharpie. You could find pictures of various Minions to draw inspiration from or just create your own as we did.

Tuesday 14 April 2015

Forest Floor Small World Play

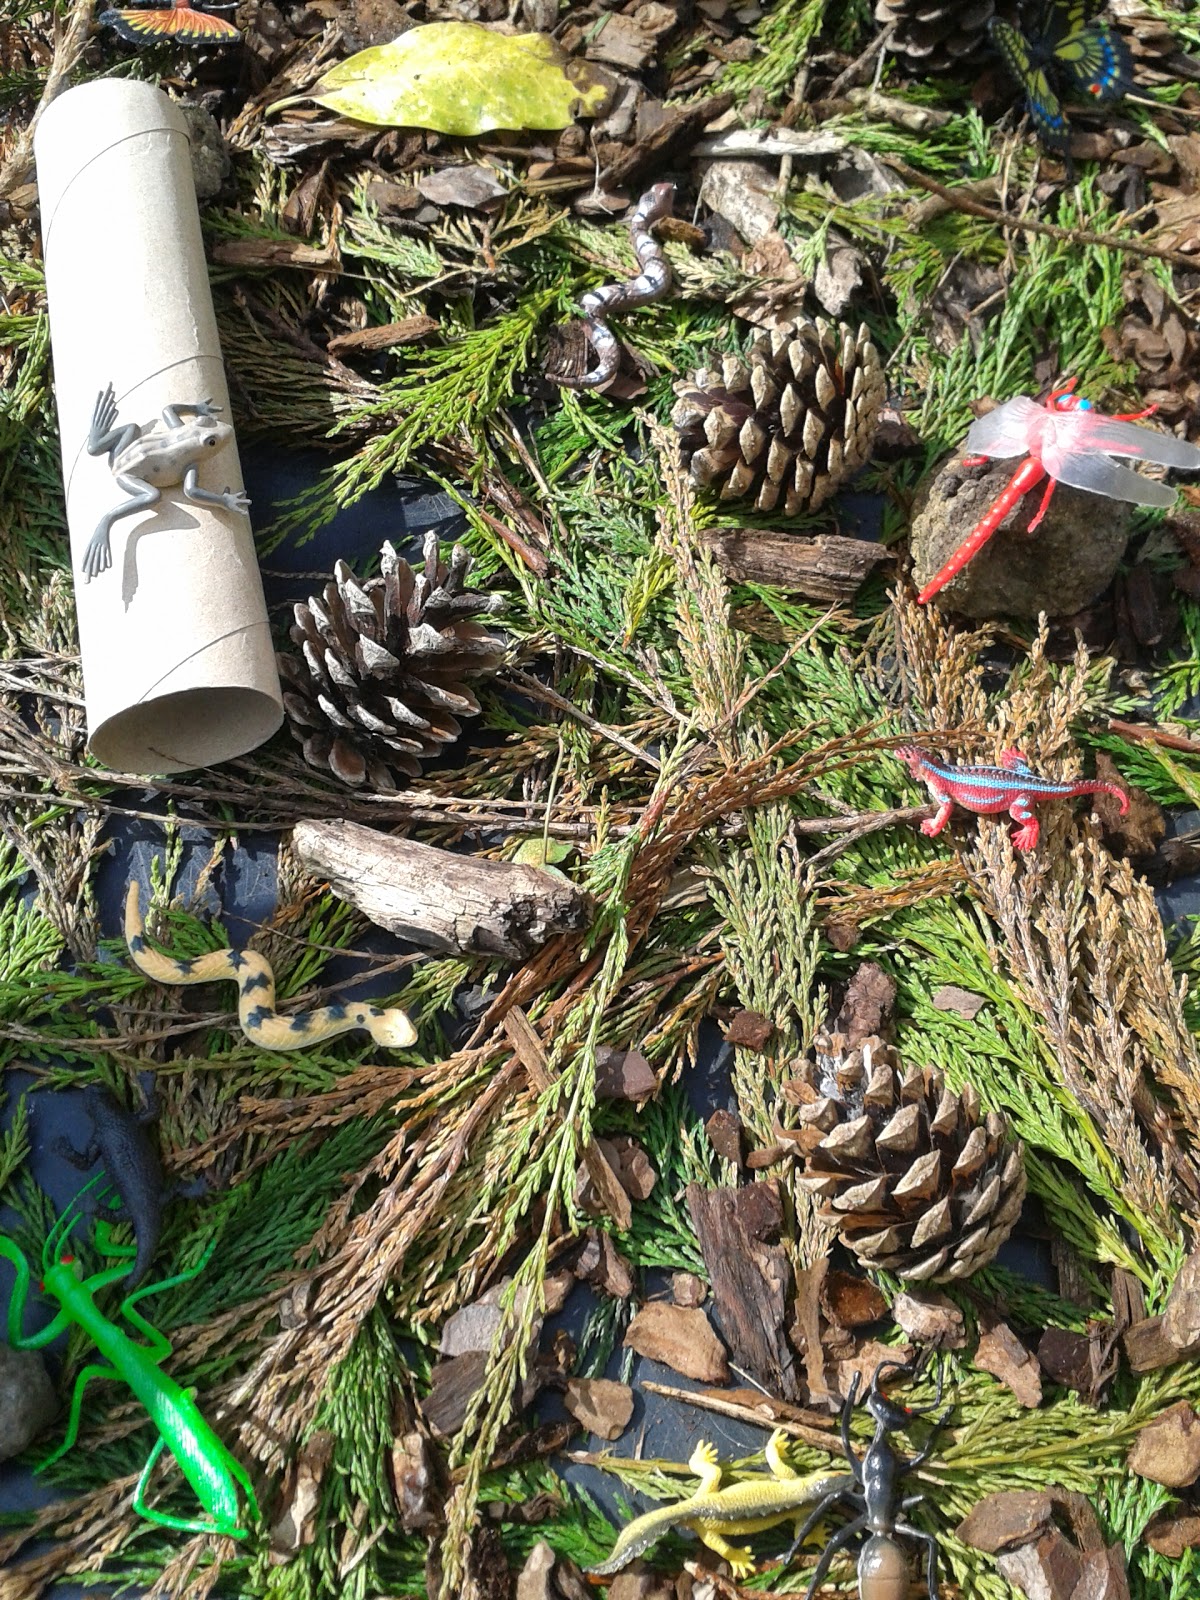
As you may have guessed, we love a bit of small world play in the Collingwood household. Following on from the success of our rockpool small world, I thought we'd make another one, this time with a forest theme. Whenever you make a small world, I think it's important to already own a lot of the 'stuff' needed to make one. It's no good trying to make a small world farm spontaneously, for instance, and then realise you only have one cow and a sheep. One cow and a sheep does not a farm make. I try and collect things I might find useful as I go, as I see them and this makes things much easier when you eventually do get round to setting a small world up. This is why I chose a forest theme - having a young boy who is fascinated by insects and bugs, we already had a sizeable collection of plastic ones.

To make the 'forest', I used lots of pine cones and twigs, bark and conifer trimmings I collected from the floor of our local maze (yes, really!). I added some toilet roll tube 'logs' and a collection of stones/ rocks from the garden for creatures to hide in and under.

The animals were two sets of Animal Planet plastic animals (an insects/bugs one and a snakes, lizards and frogs one).


During our play, we talked about camouflage and the idea of predators and prey, habitats and species. We played hide and seek with the animals, which was really tricky considering the colour of the creatures and their 'habitat.' I'd love to hear your ideas for small world play you've tried.

Rockpool Small World Play

We've really been making the most of the good weather recently and welcomed the lighter nights and school holidays, which have enabled us to get out as a family and spend more quality time together. We feel so lucky to live where we do, in the countryside as well as being five minutes away from the beach. I love nothing more than going for a walk on the beach - it's probably my favourite place to be. I love the sound of the waves crashing against the shore, the feel of the soft sand between my toes and the wind brushing my face. It's a place that you can really go to to forget any troubles and relax and unwind.

It's a long time since we've been to the beach and we've had a stressful last  few weeks so I thought we were about due a visit. So I bundled the children and the dog in the car, picked Daddy up from work (earlier than usual!) and we headed to the coast.

When I was a young child, I loved nothing more than to wander up and down the shoreline beachcombing looking for natural treasures. I'd struggle up the beach at the end of a day spent there with a pocketful of shells and stones. I still love to do it now. I never did anything with them, I was just so captured by their beauty that I just wanted to keep and treasure them. So when we all went to the beach that day, naturally we had to take home a few souvenirs. Tommy is really interested in creatures of any kind so he needed no encouragement in helping me search. We found a huge variety of shells, starfish, stones and seaweed that evening and brought them home.


As you can see, they were all very beautiful and I knew I wanted to do something with them but I wasn't sure what. That's when I came up with the idea of using them to make a rockpool in our tuff tray, which we involve regularly in our play.

We simply filled our tuff tray with water, sprinkled some play sand in the bottom and then arranged our treasures on top and added several brightly-coloured (albeit wholly unrealistic-looking) sea creatures!


You wouldn't believe how long Tommy wanted to play with this for - it lasted for an entire afternoon. And every day since, he's asked whether we can "Get that rockpool out." I'm going to try and adapt this later on by buying a few more realistic sea creatures, as our collection was pretty limited this time!
Play at Home Teacher

Playdough Easter eggs

So I've got a little behind in terms of blogging lately. Firstly, because I've been faaaaaaar too busy enjoying the Easter holidays with the children (and rightly so!) and secondly, because I've had some pretty terrible news over the last couple of weeks so I've either preoccupied or not in the right frame of mind to blog. Anyway, enough about that. I thought I'd share with you another of our Easter activities (yes, I know Easter's happened, it's all over, despite there still being a mountain of leftover Easter eggs yet to be eaten). It might just give you an idea of something you could do NEXT year though - I know we'll be doing this one again, that's for sure.

We made these playdough Easter eggs using playdough (obviously), sequins and beads, buttons, coloured matchsticks, lollipop sticks and pipe cleaners. You could use anything really that will stick into or make an indentation in the playdough - bits of pasta would even work.


Despite us only using a few items, Tommy managed to create some really interesting, creative and varied designs.


Thursday 9 April 2015

Potato Masher Easter Egg Printing

I hope everyone's been enjoying the almost summer-like weather we've been having recently. We have definitely been making the most of it! Whilst it's been sunny and warm, we've snapped up the opportunity to do some outdoor crafting. One of the activities we did recently was printing Easter eggs using a potato masher. This was so easy, quick and, most important of all, FUN!


To make our prints, we used a potato masher (it's important to find the plastic variety, which we didn't find as easy as I had hoped!), some ready-mixed paint and some white card. I tend to make things as easy as possible for myself in terms of setting up/clearing away with craft activities - I find this is particularly important when you have a younger child like we do and they're likely to need feeding/cuddling/changing etc. half way through or just as you finish. With this in mind, I often use cheap paper plates as paint palettes (it saves on the washing up!). I squirted a small splash of different-coloured paint onto the paper plates and made sure the colours overlapped a little. I also taped the card down to a tablecover, so they wouldn't blow away mid activity (yes, this has happened to us before!).

Tommy then got to work, dipping the potato masher in the paint and pressing it onto the paper and lifting it off carefully. He really loved this activity, so much so I had to go and seek out some more
paper, so that he could continue!


The technique is really effective and would make lovely simple Easter cards. Alternatively, individual eggs could be cut out to make decorations.

Wednesday 1 April 2015

Mini Egg Brownies


I regularly bake brownies - they're probably my favourite snack if I had to choose one! I've tried many recipes in the past, some good and some bad but none of them had delivered the 'perfect' brownies until I found this recipe a few months ago. More recently, I've come to think I have a problem with gluten and so this added another spanner in the works when it come to my quest to find the perfect brownie. After trying this recipe with normal  flour, I thought I'd give it a go with gluten-free flour and I'm happy to say it works equally well with both. I thought I'd give my favourite brownie recipe a little Easter twist and include my favourite Easter treat - Mini Eggs! They give brownies a lovely crunch and crispness, which is a nice contrast to the beautiful moist, gooey deliciousness around them.

Ingredients:

185g unsalted butter (I used dairy-free Vitalite)
300g dark chocolate (I used Co-Op's own, as it's gluten and dairy-free)
85g plain flour (I used Dove's Farm Gluten-free flour)
40g Cocoa powder
3 large eggs
275g golden caster sugar

Method:

  1. Cut the butter into smallish cubes and tip into a medium bowl. Break 200g of the chocolate into small pieces and drop into the bowl. Fill a small saucepan about a quarter full with hot water, then sit the bowl on top so it rests on the rim of the pan, not touching the water. Put over a low heat until the butter and chocolate have melted, stirring occasionally to mix them. Now remove the bowl from the pan. Leave the melted mixture to cool to room temperature.
  2. While you wait for the chocolate to cool, position a shelf in the middle of your oven and turn the oven on to fan 160C/conventional 180C/gas 4 (most ovens take 10-15 minutes to heat up). Using a shallow 20cm square tin, cut out a square of non-stick baking parchment to line the base. Now tip the flour and cocoa powder into a sieve held over a medium bowl, and tap and shake the sieve so they run through together and you get rid of any lumps.
  3. With a large sharp knife, chop the remaining chocolate into chunks on a board.
  4. Break the eggs into a large bowl and tip in the caster sugar. With an electric mixer on maximum speed, whisk the eggs and sugar until they look thick and creamy, like a milk shake. This can take 3-8 minutes, depending on how powerful your mixer is, so don’t lose heart. You’ll know it’s ready when the mixture becomes really pale and about double its original volume. Another check is to turn off the mixer, lift out the beaters and wiggle them from side to side. If the mixture that runs off the beaters leaves a trail on the surface of the mixture in the bowl for a second or two, you’re there.
  5. Pour the cooled chocolate mixture over the eggy mousse, then gently fold together with a rubber spatula. Plunge the spatula in at one side, take it underneath and bring it up the opposite side and in again at the middle. Continue going under and over in a figure of eight, moving the bowl round after each folding so you can get at it from all sides, until the two mixtures are one and the colour is a mottled dark brown.
  6. Hold the sieve over the bowl of eggy chocolate mixture and resift the cocoa and flour mixture, shaking the sieve from side to side, to cover the top evenly. Gently fold in this powder using the same figure of eight action as before. Finally, stir in the chocolate chunks until they’re dotted throughout and do the same with the mini eggs. 
  7. Pour the mixture into the prepared tin. Gently ease the mixture into the corners of the tin and paddle the spatula from side to side across the top to level it. Put in the oven anIf the brownie wobbles in the middle, it’s not quite done, so sliuntil the top has a shiny, papery crust and the sides are just beginning to come away from the tin. Take out of the oven.
  8. Leave in the tin until the brownie is completely cold, the turn out and cut into squares.