Showing posts with label Easter. Show all posts

Wednesday, 15 April 2015

Minion Eggs

So, I got ridiculously into Easter this year. So much so that I went completely overboard when it came to buying Eastery paraphernalia for the house, Easter gifts for the children's Easter baskets, Easter eggs/chocolate (even though I was adamant the children would NOT be getting eggs from us this year) and Easter egg hunt-related things. At the last count, I think I bought a total of 60 plastic eggs and, looking back on this now in hindsight, this was a completely ridiculous overestimation of the number I needed, particularly considering the fact we weren't intending on hosting an Easter egg hunt with lots of children and our youngest child wasn't old enough to 'hunt' eggs or eat/enjoy the treasures inside. So, let me repeat - 60, yes that's 60 plastic eggs for a one-person treasure hunt. Major miscalculation. Big. Fat. Oops. Oh well. At least they're both cheap, re-usable and useful for a variety of purposes. I do love these little plastic eggs - they're so bright and colourful and I'll be sure to use them regularly in our play and learning.

We had a particularly wet bank holiday weekend (aren't they all?!) so I searched Pinterest for a craft activity we could do that wouldn't involve a trip to the shops to buy craft supplies and I stumbled upon this.


These are so quick and easy to make and a must for any Minion/Despicable Me fan. All you need to make them is black tape, googly eyes, yellow and blue plastic eggs and a sharpie/thin permanent marker.

Start by pushing together half a yellow egg with half a blue egg (it works best if the blue part is the smaller part). Then cut a stripe of tape in half lengthways and carefully wind it halfway up on the yellow part of the egg. Stick googly eyes onto the tape (we used self-adhesive eyes to make it easer). Then add detail (mouths, dungarees, hair, eyebrows etc.) with the sharpie. You could find pictures of various Minions to draw inspiration from or just create your own as we did.

Tuesday, 14 April 2015

Playdough Easter eggs

So I've got a little behind in terms of blogging lately. Firstly, because I've been faaaaaaar too busy enjoying the Easter holidays with the children (and rightly so!) and secondly, because I've had some pretty terrible news over the last couple of weeks so I've either preoccupied or not in the right frame of mind to blog. Anyway, enough about that. I thought I'd share with you another of our Easter activities (yes, I know Easter's happened, it's all over, despite there still being a mountain of leftover Easter eggs yet to be eaten). It might just give you an idea of something you could do NEXT year though - I know we'll be doing this one again, that's for sure.

We made these playdough Easter eggs using playdough (obviously), sequins and beads, buttons, coloured matchsticks, lollipop sticks and pipe cleaners. You could use anything really that will stick into or make an indentation in the playdough - bits of pasta would even work.


Despite us only using a few items, Tommy managed to create some really interesting, creative and varied designs.


Thursday, 9 April 2015

Potato Masher Easter Egg Printing

I hope everyone's been enjoying the almost summer-like weather we've been having recently. We have definitely been making the most of it! Whilst it's been sunny and warm, we've snapped up the opportunity to do some outdoor crafting. One of the activities we did recently was printing Easter eggs using a potato masher. This was so easy, quick and, most important of all, FUN!


To make our prints, we used a potato masher (it's important to find the plastic variety, which we didn't find as easy as I had hoped!), some ready-mixed paint and some white card. I tend to make things as easy as possible for myself in terms of setting up/clearing away with craft activities - I find this is particularly important when you have a younger child like we do and they're likely to need feeding/cuddling/changing etc. half way through or just as you finish. With this in mind, I often use cheap paper plates as paint palettes (it saves on the washing up!). I squirted a small splash of different-coloured paint onto the paper plates and made sure the colours overlapped a little. I also taped the card down to a tablecover, so they wouldn't blow away mid activity (yes, this has happened to us before!).

Tommy then got to work, dipping the potato masher in the paint and pressing it onto the paper and lifting it off carefully. He really loved this activity, so much so I had to go and seek out some more
paper, so that he could continue!


The technique is really effective and would make lovely simple Easter cards. Alternatively, individual eggs could be cut out to make decorations.

Tuesday, 31 March 2015

Bird's Nest Craft

We've been well and truly throwing ourselves into Easter crafts recently. Tommy has really started to get into creative activities over the last few months, which, as a teacher, I really take pleasure in seeing. We tried this activity today. It was really simple and quick to make and the finished product is so cute!

To make it, you'll need: several pipe cleaners cut up into short sections; small strips of foam; small strands of wool; yellow card circles; googly eyes and orange card triangles; several feathers in various colours; a large semi-circle cut out of card.


To make our nest, we glued the strips of wool, pipe cleaners and foam onto the card semi-circle. Next, we added the yellow card circles to make chicks. To finish our chicks, we added eyes, beaks and some brightly-coloured feathers.


I told you it was cute! Why not give it a go this Easter? 

Sunday, 29 March 2015

Baby's First Easter Basket

I had been toying with the idea of not getting Isla an Easter basket at all. She is, after all, nearly only 7 months so anything chocolatey is completely out of the question. However, I had a bit of a rethink and came to the conclusion that it would be a good idea after all. I thought it was only fair that if I bought Tommy something for Easter, Isla would have to have something too. Also, it wouldn't seem right if the Easter bunny visited and only left something for Tommy. Tommy would be wondering why his sister had been left out! In addition to this, we needed to buy Isla some new books and a few bits and pieces anyway, so I bought we might as well put them together and present them in an Easter basket.

It can be tricky to come up with some ideas as to what to give a young baby for Easter (particularly as most Easter-related gifts tend to revolve around chocolates or sweets) but hopefully this might give you some ideas as to what you might include in an Easter basket. Most of the items I bought were inexpensive, none costing more than a couple of pounds and I bought them all from supermarkets, Amazon and cheap shops like Wilkinsons and Home Bargains. 

Here is how the whole basket looks:


The basket is a peg basket I bought for a pound from the Yorkshire Trading Company and I filled it with two bags of tissue paper straw from the Card Factory. I'm hoping I can reuse the baskets I bought year after year, as I don't like the idea of buying a new one every Easter. However, I did find these baskets a little on the small side for fitting everything I bought to go in them, but this might be due to the fact I went a little overboard on the buying front! 

Isla needed some new books so I thought I'd include several in her Easter basket. I have NO IDEA where Tommy's baby books have gone but we don't seem to have very many at all, despite keeping everything. I decided to buy books that were Easter-themed, as I like building up collections of books for different seasons and occasions.


1. 'I love you Bunny' - Home bargains
2. 'Easter Surprise' - Amazon
3. 'That's not my bunny' - Amazon
4. 'That's not my lamb' - Amazon
5. 'Hey diddle diddle' hand puppet book - Home Bargains

ALL gift baskets need to include a cuddly toy of some description in my opinion and this one was no different. I bought this super cute duck rattle from Home Bargains and a cheeping chick from Tesco.


I included some new bath ducks from Tesco and a new Tommee Tippee cup, as we've just recently started weaning and Isla needed a first cup.


The last items I included in Isla's Easter basket were a spinning light-up toy from Home Bargains and some sensory textured eggs I made with Tommy. You can find details on how to make these here. http://mummycollingwood.blogspot.co.uk/2015/03/sensory-eggs-for-baby.html


I also purchased Isla a few clothes for her Spring/Summer wardrobe. And that was it! If you've made an Easter basket for a baby/young child, I'd love to hear your ideas as to what gifts you've included in it. I'll be sharing the details of Tommy's Easter basket on the blog in the next few days, so do look out for that! 

Sensory eggs for a baby

I've been thinking for a while now as to how I might incorporate the theme of Easter into Isla's play. She's only just becoming able to sit unaided for a short while and is beginning to show enjoyment in play. I stumbled upon the idea of making textured eggs for babies and I thought I'd give these a try. The original activity can be found here: http://www.two-daloo.com/texture-eggs-sensory-play-language-activity/

Anyway, here you should find all the photos and details of our sensory eggs but the truth is, they just did not work for us. We didn't have a hot glue gun as the above post suggests you use and we attempted to make them with pva. The materials all slid off the eggs and I just became really frustrated with the whole thing and abandoned the idea. Rather than not make any at all, we made some adaptations. I roped Tommy (3) into helping me make these, as it would not only be a fun activity for him to get involved in, but it would also be a nice idea for him to make something for his sister.


We started by filling some plastic eggs (we bought ours from Hobbycraft) with lentils, peas, rice and salt. Before tipping in the salt, we made sure to tape up the holes in either end of the eggs, so that the salt wouldn't seep out. We then glued the eggs shut to make them safe for baby to handle.

At this point, we attempted to glue a variety of different materials to the outside of the eggs, but when this didn't work, we applied some brightly-coloured self-adhesive foam shapes to them.

If I had a hot-glue gun, I'd definitely attempt to make the sensory eggs shown on the webpage above. Mine don't quite match up to these but I'll definitely be giving them a go in future.


Toddler/preschooler Easter basket


I recently shared Isla's Easter basket with you and now here's Tommy's. This is the first time I've made a basket of gifts for Tommy. We don't usually make a big thing of Easter and I don't think we've actually even bought him an Easter egg before. We're not killjoys or anything like that - it's just he usually ends up with loads of them so we haven't ever needed to buy him one. Instead we've bought Tommy a toy or special treat of some kind. This year we thought we'd start a new tradition of making up Easter baskets for our children. I've been searching for suitable items to go in them for a while now.

Although I LOVE chocolate and Tommy does too, I didn't want to just buy him a truckload of sugary, sweet treats. We try to encourage him to eat healthily and don't allow him too much in the way of sweets, biscuits and chocolate and I don't see why this should change just because it's Easter. With this in mind, I decided to try and find lots of items that would encourage us to spend quality time together instead by crafting, baking and getting creative. 

First of all, I bought lots of Easter-themed books. Books can be expensive but these were far from it. I bought these from The Works' which is fab for cheap books and craft activities and supplies, and these were on offer at 4 for £5. BARGAIN! I also purchased 'Peppa's Easter Egg Hunt' from Amazon.


Tommy loves getting crafty and baking, so when I saw these i couldn't resist. I bought a Pom pom crafts activity pack, Easter-themed colouring book and cookie-making set from Tesco. If you haven't done so already, check out Tesco's extensive Easter range - they had sooooooo many great things in there, it was a struggle to decide what to buy!


I also included a Happy Easter stake from Home Bargains, as this could be used for an Easter Egg hunt or as a signpost for the Easter bunny. I bought this super cute clockwork rabbit from Wilkinsons, a cheeping chick from a Tesco and a super cute Easter decorations craft pack from the Card Factory, which also had a great selection of cheap Easter gifts.


I picked up this rabbit bubble wand from Tesco, a chick biscuit and Easter egg moulds from Home Bargains and two Malteaser rabbits.


There are so many possibilities for what you might include in a young child's Easter basket and I hope this post has given you some ideas. I'd love to hear any ideas you have for Easter basket gifts. 

Happy Easter to you all! 

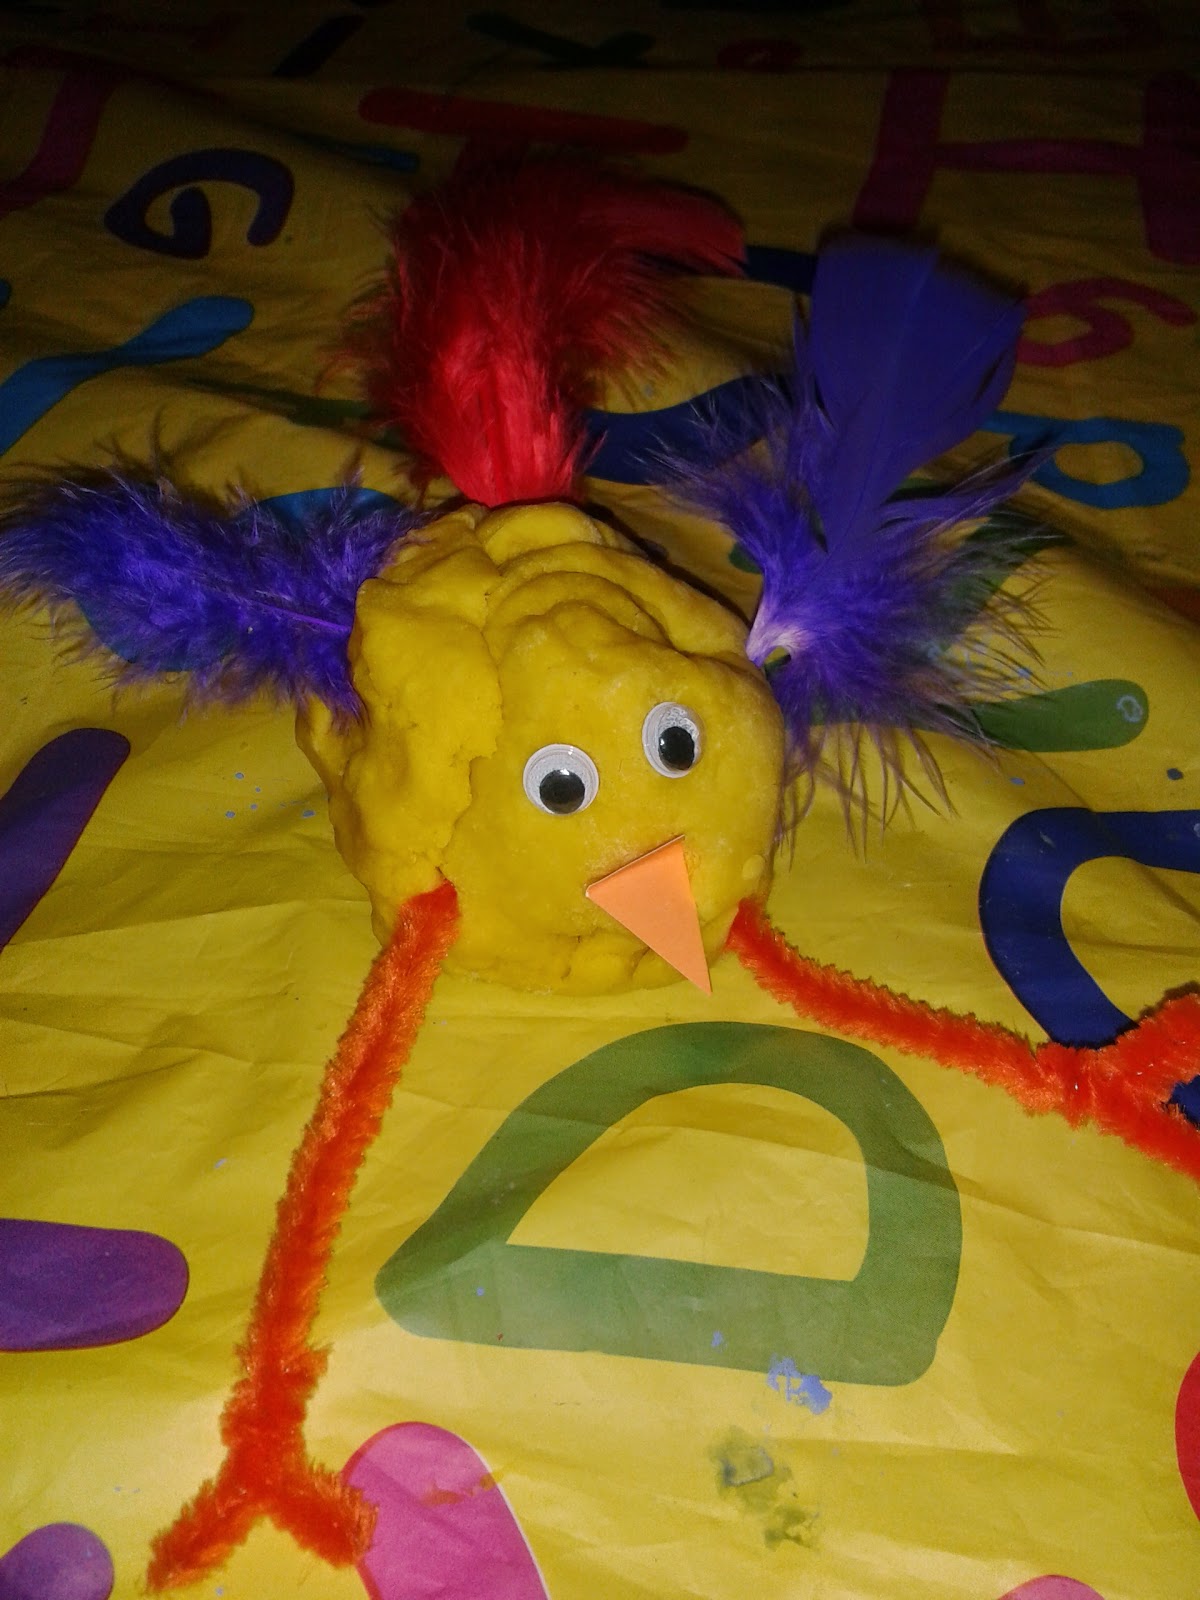
Playdough Easter Chicks

We haven't really done very much in the way of Spring/Easter crafting so far this year so I thought it was about time we started! I set up this playdough activity for Tommy to do after nursery and he spent ages doing it.


To make our Spring chicks, we used a variety of materials: one quantity of yellow playdough; an assortment of buttons; a range of googly eyes; orange pipe cleaners; different-coloured feathers and some beaks cut out of card.

I was impressed with the range of different chicks Tommy created during this activity. He really showed a lot of imagination.


Saturday, 28 February 2015

Easy Spring-themed Gluten-free biscuits

My love of baking is really starting to rub off on Tommy, who loves nothing more than to get involved in whatever I might be rustling up in the kitchen. These Spring-themed biscuits were perfect for him to make - simple, quick, easy and, most importantly of all, delicious! Tommy needed help with the weighing of the ingredients but he was able to knead the biscuit dough, roll it out and cut it into shapes all by himself.


Ingredients:
225g butter, softened
110g caster sugar
275g plain flour (we used gluten-free flour and these turned out great!)
Makes 12 large biscuits

Icing - 250g icing sugar, water, food colouring

Method:
Preheat the oven to 170C/150C fan/gas 3.
Cream the butter until light and fluffy. 
Add the sugar and beat until the mixture is pale and fluffy. 
Sift in the flour and bring the mixture together to form a firm dough. 
Roll out into a work surface to a thickness of 1-1.5cm. 
Cut into desired shapes using cookie cutters (we used rabbits, flowers and butterflies) and place on a baking tray. There is no need to line or grease your baking tray - we just used a non-stick tray and the biscuits slid off easily. 
Bake in the oven for 13-15 minutes, or until they are light golden brown and slightly firm on top.
Transfer to a wire rack to cool.


To make the icing, sift icing sugar into a bowl and add a tablespoon of water at a time until it gets to the right consistency (spreadable and just about pourable). Add gel food colouring. Once your biscuits are cool, spread the icing over the biscuits, add sprinkles and leave to set. 

Top tips for making these with small children:
1. We used ice-cream cups to store different colours of icing - it saved on the washing up and they were small enough for a child to handle easily.
2. Do the icing with the biscuits on a tray or on baking paper - this will reduce mess and spare your work tops from being coloured with food colouring.
3. Start icing the biscuits by pouring a small amount onto the middle of the biscuit and then allow your child to spread it with a knife. This helps control the amount of icing on each biscuit and also helps reduce mess.
4. Use a new cocktail stick each time you add food colouring to your icing. It will keep your food colourings nice and 'clean' and avoid contamination.