Just like thousands of other four-year-olds across the country, you started school this week Tom. You tackled this major life event in exactly the same way you have tackled everything you've experienced before - like it was no big deal. You took it in your stride like everything else that comes your way. I am always the one asking you if you are ok, hoping you still need me to do and help you with things I already know you can and will want to do yourself. I am the one who clings onto you tight a little bit longer when we cuddle or have to say goodbye to one another. I am the one who is scared to leave you and never wants to let you go. But go you must.
You had your uniform on at seven 'o' clock on that first morning and asked me over and over again when it was time to leave. You were so keen to get started. You weren't just ready to go to school on that morning; you had been ready for the months and months previous to that. We knew it, as did nursery. When we asked you if you were looking forward to school you replied "Yeah" nonchalantly, probably more than anything because that's what we wanted to hear. It wasn't that you weren't looking forward to school - you absolutely were, but everybody was making a big fuss about it and you just didn't see it as a big thing.
I have no idea where these four years have gone and it seems really cliched to say it but I don't. They just seem to have slipped away from us. I've feel so privileged to have spent most of that time with you - a year of maternity leave with you, a year of maternity leave with your sister and only working part-time has made this all possible. Don't get me wrong, I had days where I was counting down the hours until bedtime, days I wished I had gone back to work instead, days I felt so tired I could barely function and days I wished somebody else would look after you, just for a few hours to give me a break. You were VERY hard work sometimes, particularly as a tiny baby and then of course, as most children are, as a toddler.
Now more than ever there are still times when I look back and wish I could have given you more, devoted more of my time to raising you, to have been there full-time but it just wasn't possible. If I could have done, I absolutely would have. But I know I've done all I can to prepare you for your time at school. I know I've been there for you as much as I possibly could. I know we are so lucky to have spent that time together, just the two of us and form such an incredibly close bond. You made me a Mummy and taught me what it is to be a parent. I will always cherish those first few years of your life and I would never have missed them for the entire world. My only wish is that it would be possible to do them over and over again with you.
The day you first started school marked the beginning of a new, exciting chapter of our lives. It gives you an opportunity to develop on all the things we and nursery have taught you. It gives me an opportunity to raise your sister in the same way I have raised you, to spend quality time with her and help her learn and grow. It gives me an opportunity to get all the house jobs done, which will leave the weekends free for us to spend together. And boy I shall look forward to picking you up on Friday afternoon each week for each one to begin.
Tommy - you give me a reason to be proud every single day but that day I held your hand as we walked to school for the first time was my proudest moment yet. I'm not normally the kind of Mum who spouts off about how wonderful you are but the other day I wanted to shout it from the rooftops that "This is my little boy, today's his first day at school and he's going to be amazing!" When we got to your classroom, you must have said goodbye to me about ten times and then, when I hadn't taken the hint, said "Mum you can go now." A small part of me was gutted if I'm honest. Why didn't you need me? Why weren't you crying? Why weren't you clinging to my leg and not letting me leave like many of the other children were? Wasn't our bond as strong as that other parents had with their children? But the rest of me wanted to burst with pride. You didn't need me at that moment. You were mature enough and confident enough to go it alone. You were ready.
Our house has felt empty for the last few days because you are such a huge part of what makes it feel like a home. It feels like I've lost you to some extent and I'm struggling with it all. I haven't got much beyond moping and trying to keep myself occupied, even though my heart's not particularly in much at all. See I need you as much as you need me, Tom. I'm not used to being at home when you're not there and I'm struggling to adjust. Today, like most days, I shall be counting down the hours until I can walk back up to school to pick you up, you can tell me about your day and we can snuggle up with your reading book.
The day you first started school (although it wasn't to you) was a massive deal for us. We can't wait to see how it continues to shape the amazing little boy we've known and loved for the past four years. We will continue to be there through every single moment of it all with you, helping and encouraging you to do your best in everything you do.
Friday, 11 September 2015
Monday, 31 August 2015
Isla's 12 month update
Following my post on Isla turning one this last week, I thought I'd write a little bit about where she is now developmentally. We have been a bit concerned about her over the last few months, and particularly more so following her routine 9 month check, which flagged up an area of concern. There were no developmental issues that the health visitor could see, but she was concerned about the fact Isla had an extra roll or crease on one of her thighs. This was flagged up as a marker for developmental hip dysplasia. Queue me reading all about the condition on Google, convincing myself she did in fact have it, and then ending up in a mess because my little baby was almost certainly going to need a big operation and then at least three months with her leg in a cast. Anyway, to cut a long story short, Isla went to the hospital the other week for an examination and, following an examination and an x-ray, was found to have two healthy and perfect little hips. It was such a relief for us and was definitely the bit of good news we needed amongst all the bad news and setbacks we seem to have had thrown our way in recent weeks.
Isla can now say a whole host of recognisable words amongst the incessant, incoherent babble. She knows "dada", "mumma", "bubble", "dog", "there", "boo", "bear", "bird", "car" and "teddy." she greets her teddies (and sometimes the dog) with a big, fat squeeze and says "aaaaaaaaah." Isla can now and again blow us a kiss and she does this super-cute kissy face where she scrunches up her eyes and purses her lips. I keep trying to get a photo but fail miserably every time. She can clap and wave and pretend to go to sleep. Isla loves to sing and dance and she can't help but move to music from the radio or TV. She loves doing the actions to the music from "In the night garden" and "Twinkle, Twinkle Little Star.
Whilst Isla seems to be hitting all her other milestones, she hasn't been quite as quick to meet her physical ones. Quite frankly, I've been fed up of people asking "Isn't she crawling yet?" or telling me that she should be doing this and that by now or telling mr that their child is/was much younger when they learned to do x, y and z. When something like that is said to you, you always feels like it's a bit of a personal attack, like you haven't done enough to encourage your baby, like you haven't got them the right kind of toys, you haven't allowed them to practise the skills they need to be able to develop. This is, of course ridiculous and children do and will develop at their own pace, often regardless of any input you have. Yes, encouragement will speed things up but it won't drastically speed up the time it takes for them to hit their milestones.
Isla has spent some time in strength-developing contraptions but has, most of the time, been left to move around on the floor in whichever way she chose. Believe me I've tried everything the Internet/child-development literature suggests you try to encourage your baby to roll over, sit up unaided, stand, cruise, walk and it's still been to no avail. Sometimes you just have to accept that babies will do things when they are ready. It might take them longer than other babies and you might sit there at baby classes thinking "Why isn't my baby doing that yet?" and "What's wrong with my baby?" and obsessing over how old every baby/young child is that you see and how they compare to yours. It just does you no good whatsoever.
It took Isla until 11 and a half months before she learnt to crawl 'properly.' But from that point, it only then took her a week to learn how to stand and cruise around the furniture - a lot quicker than we imagined. We still await those elusive first steps, but I don't think it will be long before we get to see them. I can't wait 'til she's running around after her big brother - he won't know what's hit him!
Thursday, 27 August 2015
Turning One

Isla - it is exactly a year since you arrived into the world on a day which I thought would be one of sadness rather than celebration. When I think about it now, I believe you were meant to arrive on the date you did. You were meant to forever change the meaning of that day for us.
Isla - right from the beginning we knew how precious you would turn out to be. Of course, every baby is a wonderful gift but you were extra-special to us. Tommy will always be extremely special because he was our first-born. He made us parents and taught us how to be Mummy and Daddy. You were special for a very different reason. You were our rainbow, our child brought to us at the very moment we were questioning whether we could put ourselves through the trauma of losing a baby again, whether we would conceive again, whether there was something wrong with either one of us. The day you were born was exactly a year to the day that we were told our second baby had no heartbeat. That day you arrived, you not only completed our family, you also glued together the broken pieces of our hearts. You turned a sad anniversary into a beautiful, happy one.
Where that year has gone, I have absolutely no idea. We can't believe a whole year has passed since we held you for the first time, yet it is difficult to remember what our life was like without you in it. I remember how scarily tiny you were, how I expected you to look exactly how your brother looked but was surprised instead to see that you were nothing alike. I remember Tommy visiting and staring proudly into your crib. I remember Daddy ringing you to let you be the first person to know you had a sister and you replying "oh thank you!"
Before you were born, I felt like it was impossible to love a child as much as I loved Tommy. I felt like we couldn't possibly be lucky enough to have such a fantastic child again. I felt like I couldn't become any happier than I already was. You proved me completely wrong. There is equal room in my heart for two after all. You are equally as fantastic as your older brother, very different in some ways, very alike in others but fantastic all the same. Now I am happier than I have ever been because of you.
I love to see the relationship developing between you and your brother. Yes, there is a struggle a large percentage of the time. Yes you steal his toys, get in his way and mean his time with Mummy and Daddy now has to be shared. He doesn't think much to the situation at times and I've regularly raised my concerns about whether you are going to get along or be close to one another. But he is also fiercely protective of you. He won't let anyone come near you if we are out. He climbs into your crib in a morning and talks gently and kindly to you. He helps you when he sees you struggle to do something by yourself. He plays with you, encourages you, teaches you (albeit rather boisterously). When you go to nursery, he only makes it to just past breakfast before he asks if we can go and collect you. You've made him a big brother and what I hope will be a lifelong best friend so thank you.
We can't believe how much you have grown and changed during the past 12 months. You've gone from a newborn only capable of pooing, sleeping, crying and feeding to a little girl who is beginning to talk, develop a personality and get pretty much anywhere she wants to. You love music and making lots of noise. When music is played, you can't help but dance. You love to play the fool and certainly know how to make us laugh. You are mischievous and have an understanding of right and wrong, although often choosing to ignore what we tell you to/not to do. Toddlerdom is DEFINITELY on the horizon.
You are a very cuddly baby, you always have been. Mummy and Daddy cuddles are your favourite but you also like your soft toys and say "ahhhhhhhhh" whilst squeezing them tight. Food is a huge hit with you; we're still on the hunt for something you DON'T like! Nothing makes us laugh more than when you are around food and your mouth opens as wide as it can possibly go, just like a baby bird waiting for the return of its Mum. I imagine this is how you will always communicate your need for food or drink. You are such a noisy baby and always voicing your thoughts or demands.
You are beautiful. Everybody says so, we're not just biased. You have a twinkle in your eye that captivates everybody and means that you always have them wrapped around your little finger. I've never heard Tommy laugh any more than the way he does when he is with you.
Isla Gracey Doo (as Tommy calls you), you are already far more than we ever hoped or imagined you would be. You, along with your big brother, give me a reason to be proud every single day. We can't wait to see what the next year with you brings. Love you my little one-year-old rainbow baby.
Sunday, 26 July 2015
Our Summer Bucket List - ice dinosaur eggs
Tommy has been obsessed with dinosaurs ever since I can remember, so when I stumbled upon this activity a while ago, I knew we just had to try it. It's an activity that's perfect for doing in the garden on a hot summer's day so it was definitely going to be featuring in our Summer bucket list. It doesn't have to be done with dinosaurs - mini toy cars, small figurines, numbers, letters - whatever you like - can be encased in ice.
To make these eggs, I carefully inserted each dinosaur into an ordinary balloon. I thought water balloons would work best for this but I couldn't get it to work. Water balloons were just far too thin and ripped easily when I tried to insert the dinosaurs. Ordinary balloons were much stronger and didn't rip or puncture. Once the dinosaur was fully inside the balloon, I filled it with water, tied a knot in the end and out it in the freezer overnight. When we were ready to do the activity, I cut the balloons away from the ice and placed them all in a box.


I provided Tommy with chisels and hammers to help break the ice and pipettes and squeezy bottles and a bowl of warm water. He then set to work trying to free each dinosaur from their ice egg. He wore some safety goggles to do this (well swimming goggles actually, but they protected his eyes as he worked nevertheless!)

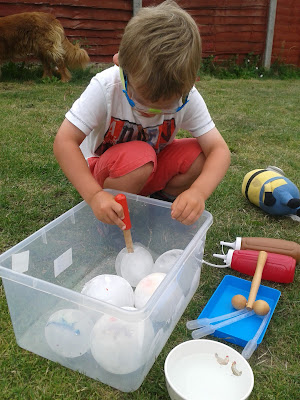


I was surprised at just how long Tommy sustained concentration during this activity. The good thing about it is that it WILL take them ages to free their items so they will be occupied for quite a while and you can just leave them too it. We'll be sure to repeat this activity again, perhaps with some small figurines. I can only hope it will be as big a hit as it was when we did it the other day!
To make these eggs, I carefully inserted each dinosaur into an ordinary balloon. I thought water balloons would work best for this but I couldn't get it to work. Water balloons were just far too thin and ripped easily when I tried to insert the dinosaurs. Ordinary balloons were much stronger and didn't rip or puncture. Once the dinosaur was fully inside the balloon, I filled it with water, tied a knot in the end and out it in the freezer overnight. When we were ready to do the activity, I cut the balloons away from the ice and placed them all in a box.


I provided Tommy with chisels and hammers to help break the ice and pipettes and squeezy bottles and a bowl of warm water. He then set to work trying to free each dinosaur from their ice egg. He wore some safety goggles to do this (well swimming goggles actually, but they protected his eyes as he worked nevertheless!)


I was surprised at just how long Tommy sustained concentration during this activity. The good thing about it is that it WILL take them ages to free their items so they will be occupied for quite a while and you can just leave them too it. We'll be sure to repeat this activity again, perhaps with some small figurines. I can only hope it will be as big a hit as it was when we did it the other day!
Saturday, 25 July 2015
Our Summer Bucket List - bubble painting
I have absolutely NO idea why we haven't done bubble painting at home before. It's been an activity I've had 'pinned' for years but just completely forgotten about until Tommy came home from nursery the other day. He isn't usually very forthcoming when it comes to sharing what he has been doing at nursery. So on the occasions when he does start to tell me about his day, I know he'll have done something really exciting. Tommy was so excited to tell me all about his bubble painting activity and went into giving me a detailed set of instructions as to how it is done. As it was something I've wanted to do for ages and something Tommy really enjoyed, we decided to add it to our Summer bucket list.
We had a lovely warm, sunny day the other day so we took the opportunity to do this. Ideally, bubble painting does need to be done outside or, at the very least, in an area of your house that isn't carpeted. It isn't hugely messy but there is the temptation to go really crazy with the bubbles (as Tommy did!) and it absolutely has to be done!
I set up a table with paints, paper and the ingredients needed to make the bubble mixture. I used plastic cups to make each colour, as it saved on having to clear up later. I love messy activities, but I like to keep any preparation and cleaning-up to an absolute minimum.

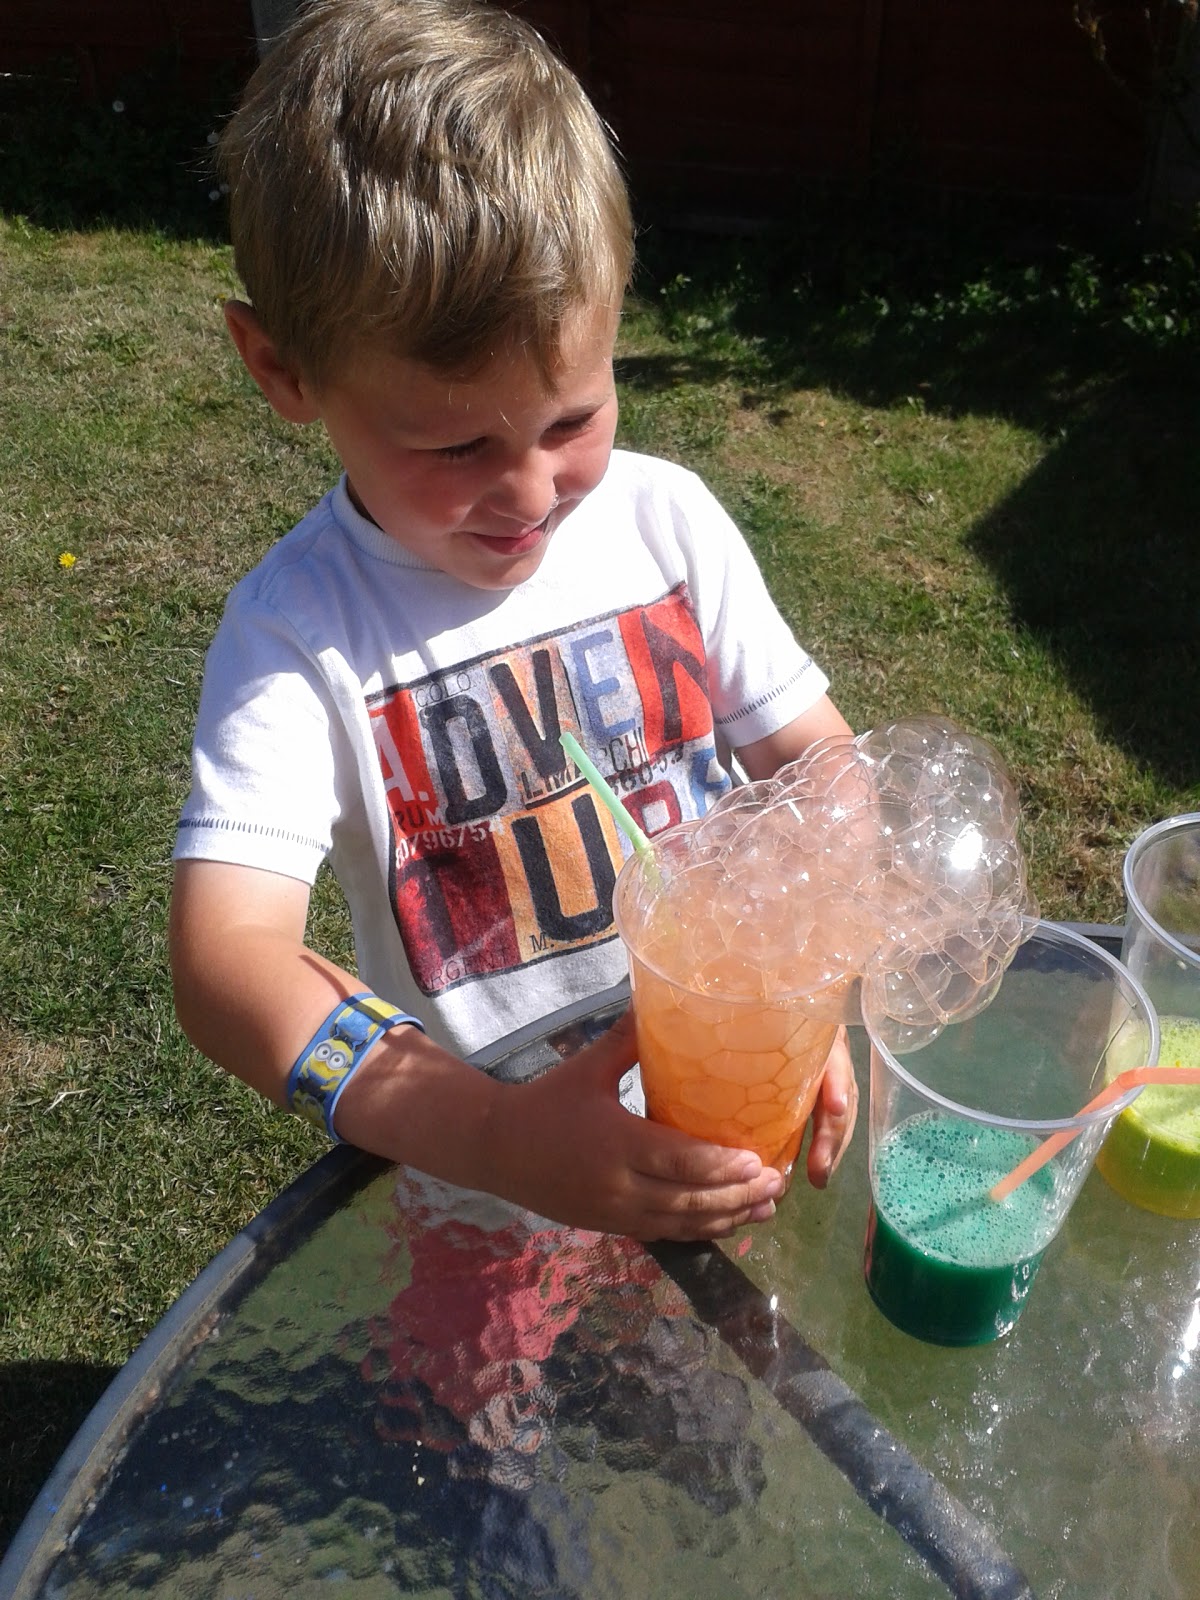
To make the bubble mixture, I poured poster paint into a cup to a depth of about 1cm. Using enough paint is key to the process and impact of the finished piece of artwork. If you don't use enough paint, the colour will be too diluted and end up not making a print on the paper. I added some washing up liquid to the cup and topped it up with water and then mixed the ingredients together with a spoon. I tried a test print at this point to make sure the mixture was frothy enough to bubble up and I had used enough paint to make a bright print.
To make your artwork, you simply put a straw in your cup and continue to blow through it until the bubbles reach over the top of the cup. You then place your paper gently over the bubbles to make your print and then repeat with lots of different colours.


We did this activity twice in one day and did it again a few days later using the same bubble paints. Bubble painting is so quick and easy to do, sooooooo much fun and the resulting piece of artwork is really beautiful too. We were really delighted with ours.

We had a lovely warm, sunny day the other day so we took the opportunity to do this. Ideally, bubble painting does need to be done outside or, at the very least, in an area of your house that isn't carpeted. It isn't hugely messy but there is the temptation to go really crazy with the bubbles (as Tommy did!) and it absolutely has to be done!
I set up a table with paints, paper and the ingredients needed to make the bubble mixture. I used plastic cups to make each colour, as it saved on having to clear up later. I love messy activities, but I like to keep any preparation and cleaning-up to an absolute minimum.

To make the bubble mixture, I poured poster paint into a cup to a depth of about 1cm. Using enough paint is key to the process and impact of the finished piece of artwork. If you don't use enough paint, the colour will be too diluted and end up not making a print on the paper. I added some washing up liquid to the cup and topped it up with water and then mixed the ingredients together with a spoon. I tried a test print at this point to make sure the mixture was frothy enough to bubble up and I had used enough paint to make a bright print.
To make your artwork, you simply put a straw in your cup and continue to blow through it until the bubbles reach over the top of the cup. You then place your paper gently over the bubbles to make your print and then repeat with lots of different colours.


We did this activity twice in one day and did it again a few days later using the same bubble paints. Bubble painting is so quick and easy to do, sooooooo much fun and the resulting piece of artwork is really beautiful too. We were really delighted with ours.

Friday, 24 July 2015
Shark and turtle paper plate crafts
We are really trying to make headway with our Summer bucket list we wrote earlier this week. You can find it here, if you haven't seen it already. One of our most special days out was a trip t the local aquarium. We've never really had a local aquarium as such - the nearest used to be over an hour's drive away, which is pretty poor considering we live just five miles away from the coast. This summer however, we were delighted to discover a new aquarium was opening in Skegness, not far form where we live. As it wasn't a particularly great day weather-wise yesterday, coupled with the fact Skegness isn't especially busy yet, we decided to visit for the afternoon. I'll be writing a post about our trip there soon, so look out for it, particularly if you live nearby.
Anyway, our trip to the aquarium renewed Tommy's interest in sea creatures. He's always loved learning about them and when he was about two he loved nothing more than watching David Attenborough documentaries. He's DEFINITELY my child! Today was a particularly grim day, so we couldn't do much in the way of outdoor play so we decided to do some crafting instead. Using the ocean as our theme, I asked Tommy what creatures he'd like to try and create and eventually, after much deliberating, we decided on sharks, turtles, jellyfish and octopuses.
I was quite confident that we could make one of each in one afternoon but that was never going to happen, so we just got round to making the shark and turtle. To make the shark, we used paper plates, paint, card, glue and cellotape.
We started by painting the top half of the paper plate grey and then cut fins out and painted those before leaving them to dry. We then cut a semi-circle out of red card and glued it onto the white half of the paper plate. Google eyes were then added and we used white card to make the teeth.


To make the turtles, I cut squares of corrugated cardboard, tissue paper, foam, crepe paper and card and then we glued these on to the paper plate We cut out a head and fins and cellotaped them onto the back before adding google eyes and some glitter on the fins and head.


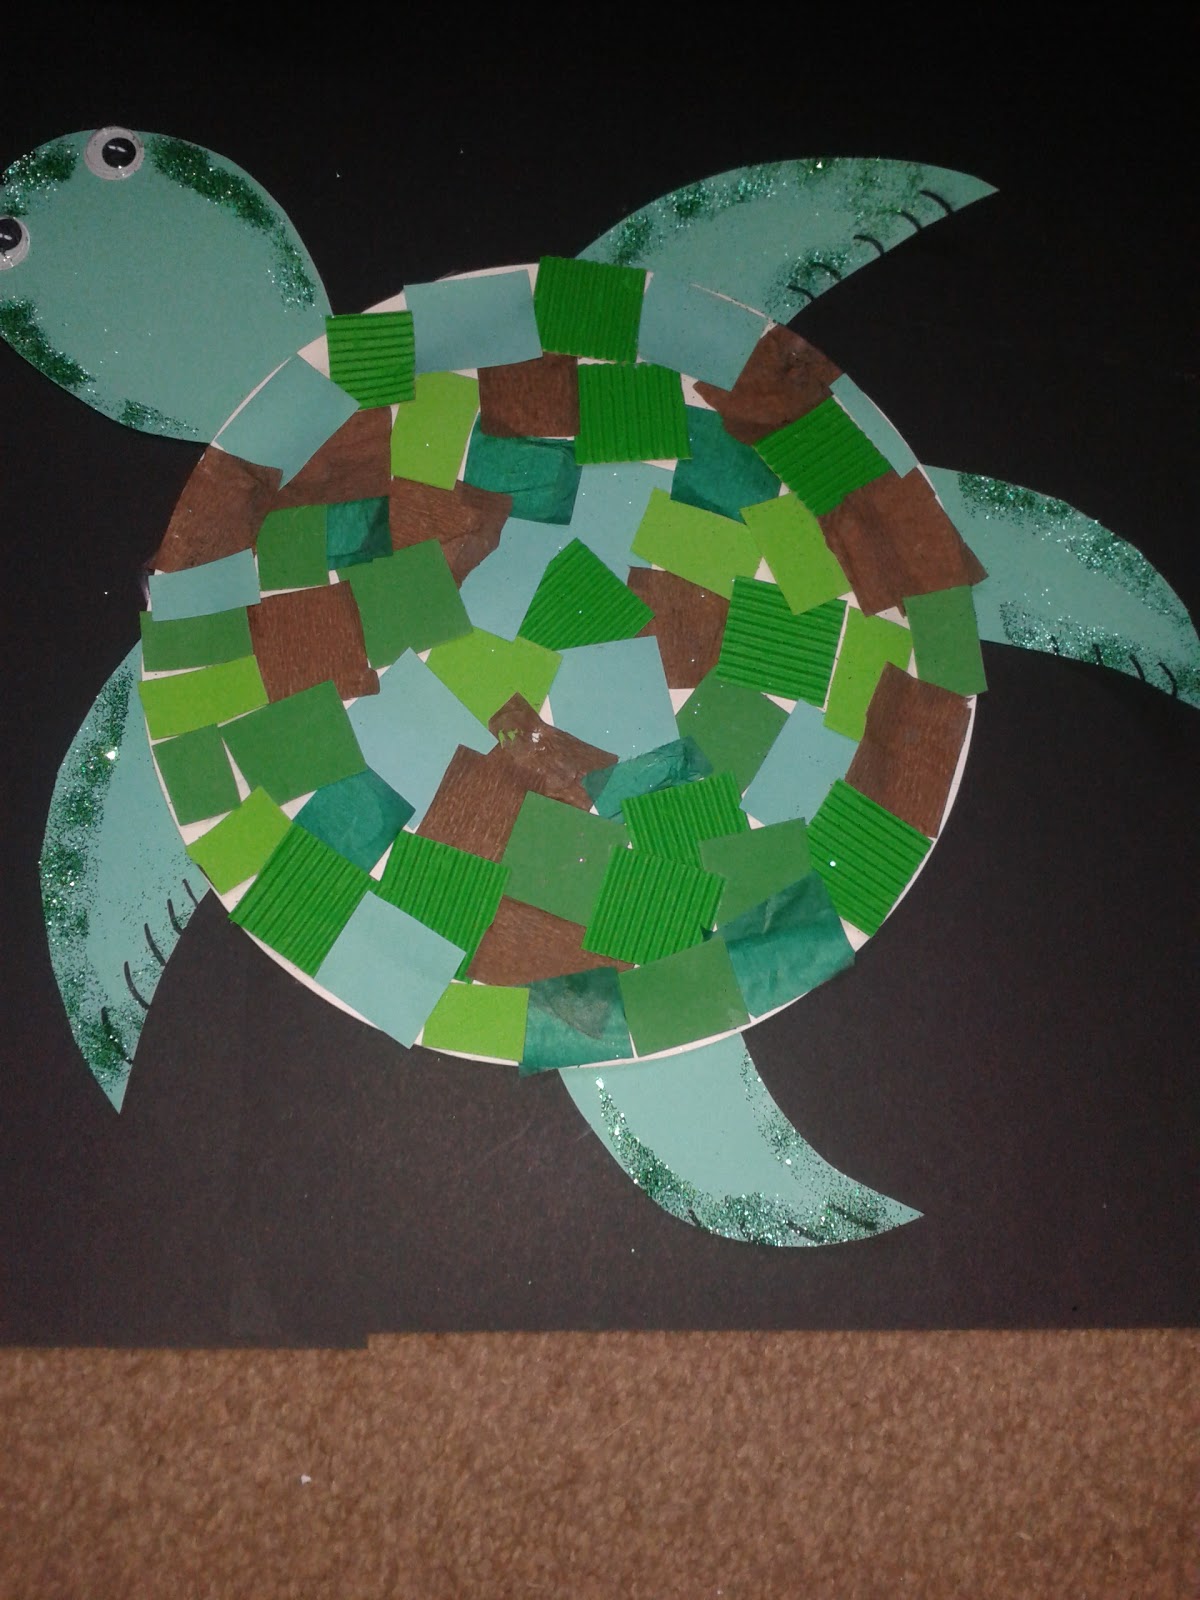
Both crafts were super easy to make, requiring us only to use a few materials and super cute!!!
DIY ribbon and lace box
It was on holiday that I got the idea for making one of these. Isla is obsessed with laces, labels and tags at the moment (as I'm sure any child her age is). She spends ages playing with them, pulling them, turning them over, waving them in her hands. She just finds them fascinating. Let's face it though, a cord of any kind presents a hazard to children and so, with this in mind, I wanted to make Isla something with ribbons and laces that would actually be safe for her to play with.
To make her 'toy', I used an old shoe box, offcuts of wrapping paper, a variety of colourful laces and ribbons, scissors, cellotape, a knife and a pen. It's better to use a lidded box with a lid that can be completely removed, as this makes it easier for threading the laces and ribbons later on.

I started by covering the shoe box in the wrapping paper. It helps to make a rough net first so that the paper fits neatly around the box. I then used a pen to make holes in the sides and ends of the box and threaded laces through. Once the laces were through each side, I made a large knot at each end so that Isla could pull the laces out slightly but not enough to pose a danger. I should mention at this point that with anything like this, babies should not be left to play unsupervised anyway.


For the ribbons, I used a small sharp knife to cut a slit in the sides of the box and threaded them through. When using the pen/knife to make holes in the box, it helps to wiggle them slightly to increase the size of the holes and this will make it much easier when it comes to threading your materials through. At this point, you could also put some jingle bells (or something noisy) inside the box to make it more multi-sensory. I didn't bother with this though.


I wasn't really sure how well this 'toy' would be received to be honest. Usually when I take lots of time to make something for Isla, it doesn't take long before it's shoved aside in favour of something completely ordinary. However, I was delighted to see her engaging with it for a lot longer than I expected. It's been out on a few occasions since.


A box like this is fantastic for developing a whole host of skills, including concentration, fine-motor skills and problem-solving ability. Making a toy can be a bit soul-destroying when you realise actually they're not so keen on playing with something you've spent a lot of time making and put a lot of thought into. In this case though, my hard work paid off and we've been using the box regularly ever since.
Have you made any DIY toys for your baby before? If so, I'd love to hear your ideas if you have.
To make her 'toy', I used an old shoe box, offcuts of wrapping paper, a variety of colourful laces and ribbons, scissors, cellotape, a knife and a pen. It's better to use a lidded box with a lid that can be completely removed, as this makes it easier for threading the laces and ribbons later on.

I started by covering the shoe box in the wrapping paper. It helps to make a rough net first so that the paper fits neatly around the box. I then used a pen to make holes in the sides and ends of the box and threaded laces through. Once the laces were through each side, I made a large knot at each end so that Isla could pull the laces out slightly but not enough to pose a danger. I should mention at this point that with anything like this, babies should not be left to play unsupervised anyway.


For the ribbons, I used a small sharp knife to cut a slit in the sides of the box and threaded them through. When using the pen/knife to make holes in the box, it helps to wiggle them slightly to increase the size of the holes and this will make it much easier when it comes to threading your materials through. At this point, you could also put some jingle bells (or something noisy) inside the box to make it more multi-sensory. I didn't bother with this though.


I wasn't really sure how well this 'toy' would be received to be honest. Usually when I take lots of time to make something for Isla, it doesn't take long before it's shoved aside in favour of something completely ordinary. However, I was delighted to see her engaging with it for a lot longer than I expected. It's been out on a few occasions since.


Have you made any DIY toys for your baby before? If so, I'd love to hear your ideas if you have.
Tuesday, 21 July 2015
Our Summer Bucket List 2015
It's finally beginning to dawn on me that I'll be losing my 'baby' in September when he goes off to school for the first time. I always knew it would be coming this year and yet, somehow, I'd pushed it to the back of my mind because I can't quite frankly begin to contemplate not having Tommy around every single day like I'm used to. Yes. I KNOW school will only be from 9am til 3pm. Yes. I KNOW there are weekends, holidays and, with me being lucky enough to be a teacher, I KNOW we will be spending weeks and weeks of the year together. Yes. I KNOW for three days a week I'll be at work anyway, just like I was before I went on maternity leave when I was pregnant with Isla. Yet I just feel so so sad about it all. I'm trying not to dwell too much on it all, trying not to let it get to me and this is really what has prompted me to come up with a bucket list for the summer holidays - somethin to positive to focus on, rather than dwelling on my thoughts.
As I've just mentioned, we will always spend the summer holidays together, so every year there will be lots of opportunities for fun outings, activities and crafts but I kind of wanted to make this summer one to remember and one that would give Tommy a final 'push' in preparing him for big school. Another reason for compiling a summer bucket list is to really make sure we start and make the most of those precious six weeks together, rather than getting to the end and thinking "what did we really do/achieve during that time?" Six weeks seems such a long time but every single year it flies by - the "back to school" signs are up in the shops before the end of the school year and before you know it, you're back in your classroom introducing yourself to your new class.
There are a huge number of summer bucket lists on Pinterest or on the Internet, that many that I just didn't know where to start. So instead I scrapped the idea of looking for the most perfect existing list and just wrote my own. our list includes a combination of some really special places to visit, lots of things that we do every week anyway, activities led by Tommy's interests, things Tommy has mentioned he'd like to do but we haven't got round to and simple craft projects.
I was also faced with the dilemma of where to write our list. I initially thought about writing it all on a large chalkboard but I was worried about presenting it nicely enough, having enough space on the board to fit everything in, items getting rubbed off or not having any space left to write additional ideas on (I know, I got waaaaaaay too into this at one point!) Eventually, I decided on a (nice and easy!) jam jar with each activity written on a lollipop stick. I've also included some extra blank lollipop sticks should anything else spring to mind.
So here is my list. It won't be suitable/doable for everyone but it might give you some ideas as to what to include if you are considering making a summer bucket list yourself. My advice is just to pick things that you can easily achieve, places that you can easily get to, some extra-special treats and things that will allow you as a family to spend quality time together. The teacher in me always seeks to find opportunities for different areas of learning too, so you might want to consider this.
Our Summer Bucket List
1. Go pond-dipping
2. Water balloon painting
3. Go on a pedalo
4. Feed the ducks
5. Make fruit kebabs
6. Make homemad pizzas
7. Fly a kite
8. Paddle in a stream
9. Garden safari
10. Make a den
11. Buy 1st pair of school shoes
12. Go berry-picking
13. Make ice-lollies
14. DIY water wall
15. Floating/sinking experiment
16. Moon/cloud dough
17. Ball-pit balls in the paddling pool
18. Make bird-feeders
19. Go bug-hunting
20. Look for shapes in the clouds
21. Make an ice-cream factory
22. Buy school uniform
23. Paddle in the sea
24. Build a sandcastle
25. Bubble-painting
26. Visit the aquarium
27. Wash the car
28. Ride bike without stabilisers
29. Play crazy golf
30. Ice dinosaur eggs
31. Picnic in the park
32. Water balloon fight
33. Make an obstacle course in the garden
34. Ride a donkey on the beach
35. Visit the farm
36. Play at a splash pad
37. Visit the zoo
38. Face painting
39. Trip to the beach
40. Find our way through a maze
I'm sure we'll think of many more to add to the list. If you can think of anything else, please let me know of anything I've missed. I'd love to hear what makes the summer holidays special for your family.
I've typed up our list on the laptop, so that I can glance at it in the morning or discuss it with Tommy in order to help to decide what we might do on a particular day. This will be more helpful trying to rifle through the lollipop sticks to find something appropriate! I'm hoping that this list of activities is realistic and achievable. If we do manage to do all of these things, I'm sure it will make for a fantastic summer holiday. Happy holidays everyone!
Tuesday, 19 May 2015
Foil Painting
As a child, I loved nothing more than to sit down with a colouring book and some pencils or a pad of paper and just draw/colour away for hours on end. Whilst Tommy definitely looks like me, he certainly isn't like me in terms of the things he enjoys doing the most. He is just an outdoorsy kind of boy; he loves nothing more than running around the garden, playing football, chasing Daddy or the dog and just generally being active. Although he enjoys anything and everything, painting and drawing are probably his least favourite activities. Some people say it's a gender thing, others an age thing but I tend to see it as a personal thing - he's just not really as interested in doing it as he is other things. I am fine with this to an extent, but whilst I want to obviously try and do activities with him I know he will enjoy and not try and force him into doing them, it is important for him to draw and paint regularly to help with his fine motor skills and creative development. Therefore I do build regular opportunities for doing artwork into his time at home.


Whilst Tommy can read a huge number of high frequency words, 'read' numbers up to 100 and knows all of his sounds, he is more reluctant to write and it always feels like I'm pushing him to do it rather than encouraging him. We're trying lots of fun ways of getting him to write at the moment, most of which have been successful, so I really think that I multi-sensory/more practical approach is going to be the route to go down. With this in mind, I've been looking for lots of different ways we can incorporate mark/making and emerging writing into our play.
We found the idea of foil-painting on Pinterest and thought it would be a good one to try with Tommy. To set it up, we placed long lengths of tin foil in a tuff tray and stuck them down using cellotape. I then drew lots of different patterns on individual coloured cards so that Tommy could practise drawing a range of different shapes. This provided him with a starting point and gave him a little inspiration as to the kinds of patterns he might create. Tommy is getting really good at copying shapes and patterns without having to trace. We used ordinary poster paint for this activity. I was a little worried about how quickly it would dry but it actually surprised me how little time it took.

I pretty much expected this activity to last for just a few minutes - I always prepare myself for this when we paint or draw, knowing how little Tommy enjoys it. However, we managed to continue this activity for ages. It even warranted me to remove our piece of artwork and replace it with another blank foil canvas and there was a request to do it another day!
We really enjoyed this activity and it would be lovely to do with a younger child too - the tin foil makes a lovely noise when it's painted on and it's a lovely surface to swirl the paint around on. Here is one of our masterpieces:

Tuesday, 12 May 2015
2D Spring Flower Suncatcher
I recently shared with you our 3D Spring Flower suncatcher we made together. We had some flowers left over from doing this, so I decided we'd make a few 2D versions. To make them, you'll need some sticky-back plastic, some coloured card or foam and some Spring flowers/leaves/petals.
I started by cutting out some 2D shape outlines out of foam. You could use card for this but I felt foam was a bit thicker and less flimsy. I then cut out sections of sticky-backed plastic big enough to fit the outlines onto and then stuck them on.

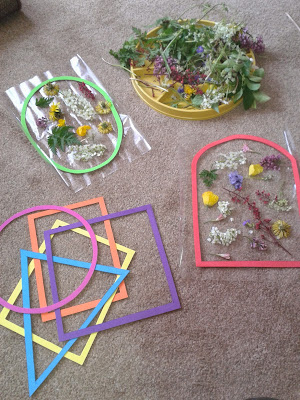


Tommy then set about arranging his flowers and leaves on top, pressing them down firmly to ensure they stuck to the plastic. I then sealed the pieces of artwork by adding a layer of sticky-backed plastic on the top and cut off any excess.


Again, I'm really pleased with how these have turned out. They've really brightened up our window and I'm hoping because they're sealed they'll last a little longer than our 3D version. I'd kind of like them to be up on the window for a while!
I started by cutting out some 2D shape outlines out of foam. You could use card for this but I felt foam was a bit thicker and less flimsy. I then cut out sections of sticky-backed plastic big enough to fit the outlines onto and then stuck them on.


Tommy then set about arranging his flowers and leaves on top, pressing them down firmly to ensure they stuck to the plastic. I then sealed the pieces of artwork by adding a layer of sticky-backed plastic on the top and cut off any excess.


Again, I'm really pleased with how these have turned out. They've really brightened up our window and I'm hoping because they're sealed they'll last a little longer than our 3D version. I'd kind of like them to be up on the window for a while!
3D Spring Flower Suncatchers
I have soooooo much love for the Spring season. Everything just seems to be bursting into life and so bright and colourful at the moment. It really is one of my favourite times of the year. We've been taking some time out from what we normally do over the last few weeks, after a difficult time we've had recently and we've been trying to take our mind off things by going out and enjoying the nicer weather. So I've been quite quiet and not posted much on here in the way of craft/play activities because we haven't really done much at all since Easter.
I've always seen it as really important for children to see beauty in what is around them and to appreciate nature. It's something I always try to instill in Tommy and I will aim to do the same with Isla. Life is usually ridiculously busy, with little time to stop and look at what is around where you live or work. Children are constantly surrounded by toys and technology and it's nice to get away from this now and again, to experience some quiet time, to appreciate the environment and reflect on how lucky we are to live where we live. I definitely want our children to value and appreciate everything, particularly the things in life that are 'free' rather than commodities. I want them to get as much (or perhaps more) out of a walk on the beach or in the woods as they would do if we were to take them to Alton Towers. If we 'sell' these things as exciting, they will see them as such.
With this in mind, I wanted to create something that was a reflection of everything that was going on in the environment around us, something that would draw attention to the changes that had been happening as we had entered the season of Spring. We decided on a walk to collect 'evidence' of Spring - buds, blooms, different colours, blossom, leaves, greenery, anything really that suggested growth or new life. We found a large bucket and took it on a local walk around the village, through the park and the woods to collect our materials. There were no rules as to what went in the bucket, as long as it wasn't picked or pulled off a plant/tree. It's been extremely windy here over the last few weeks, so it just wasn't necessary to resort to picking flowers. We did take a few petals or flowers off the plants in our own garden though.
I didn't imagine this walk would be quite the hit it turned out to be. I encouraged Tommy to find as many different colours as he possibly could because our aim was to create a beautiful, colourful piece of art, and it was a challenge he couldn't resist. I also encouraged him to try and find a range of different kinds of materials, from spiky ones to smooth ones, from large-flowered ones to small-flowered ones, from fern-like leaves to broad ones and this really motivated him. We talked about the different plant names as we came across them and I was surprised to learn how much Tommy knew already.

Once we had collected a variety of leaves, flowers, blossom and petals, we returned home and then looked for ideas as to what to do with them. On Pinterest, I stumbled upon the idea of producing a 3D suncatcher. It was the perfect idea for making a piece of art out of our natural materials so we set about making it immediately.
To make it, you need a small cardboard box, some sticky-backed plastic, a collection of natural materials and some paint (optional). The box needs to be quite strong if you intend to paint it like we did.
First of all, we cut an aperture out of each side of our suncatcher, leaving a centimetre border around the edges. We cut the top off the box and then painted it white to make it look a little more attractive. The next step was to stick the sticky-backed plastic, with the sticky side facing outwards, onto the inside of the box's sides. Then Tommy carefully placed his leaves and flowers onto the sticky-backed plastic. Some of the leaves/flowers stuck better than others. The best tip I can offer is that the smaller they are, the better they will stick to the plastic. Try to create interest by sticking a variety of plants onto each side. To finish the suncatcher off, you could then cover each side with a further piece of sticky-backed plastic, to sandwich in your flowers/plants and stop them from dropping off. We didn't bother with this step, as I felt it looked just right as it was.
I'm so pleased with how this project turned out. The suncatcher is just so beautiful - it captures the sunlight so wonderfully and looks as though every single tiny piece was carefully and perfectly-placed, even though in reality it was just whacked on! I love how very different it looks from each side.


 I know it won't last very long unfortunately, as the flowers will die quickly; I don't know if you could get around this by drying and pressing the flowers beforehand. But I shall enjoy having it on our windowsill in the meantime!
With this in mind, I wanted to create something that was a reflection of everything that was going on in the environment around us, something that would draw attention to the changes that had been happening as we had entered the season of Spring. We decided on a walk to collect 'evidence' of Spring - buds, blooms, different colours, blossom, leaves, greenery, anything really that suggested growth or new life. We found a large bucket and took it on a local walk around the village, through the park and the woods to collect our materials. There were no rules as to what went in the bucket, as long as it wasn't picked or pulled off a plant/tree. It's been extremely windy here over the last few weeks, so it just wasn't necessary to resort to picking flowers. We did take a few petals or flowers off the plants in our own garden though.
I didn't imagine this walk would be quite the hit it turned out to be. I encouraged Tommy to find as many different colours as he possibly could because our aim was to create a beautiful, colourful piece of art, and it was a challenge he couldn't resist. I also encouraged him to try and find a range of different kinds of materials, from spiky ones to smooth ones, from large-flowered ones to small-flowered ones, from fern-like leaves to broad ones and this really motivated him. We talked about the different plant names as we came across them and I was surprised to learn how much Tommy knew already.

Once we had collected a variety of leaves, flowers, blossom and petals, we returned home and then looked for ideas as to what to do with them. On Pinterest, I stumbled upon the idea of producing a 3D suncatcher. It was the perfect idea for making a piece of art out of our natural materials so we set about making it immediately.
To make it, you need a small cardboard box, some sticky-backed plastic, a collection of natural materials and some paint (optional). The box needs to be quite strong if you intend to paint it like we did.
First of all, we cut an aperture out of each side of our suncatcher, leaving a centimetre border around the edges. We cut the top off the box and then painted it white to make it look a little more attractive. The next step was to stick the sticky-backed plastic, with the sticky side facing outwards, onto the inside of the box's sides. Then Tommy carefully placed his leaves and flowers onto the sticky-backed plastic. Some of the leaves/flowers stuck better than others. The best tip I can offer is that the smaller they are, the better they will stick to the plastic. Try to create interest by sticking a variety of plants onto each side. To finish the suncatcher off, you could then cover each side with a further piece of sticky-backed plastic, to sandwich in your flowers/plants and stop them from dropping off. We didn't bother with this step, as I felt it looked just right as it was.
I'm so pleased with how this project turned out. The suncatcher is just so beautiful - it captures the sunlight so wonderfully and looks as though every single tiny piece was carefully and perfectly-placed, even though in reality it was just whacked on! I love how very different it looks from each side.


Wednesday, 6 May 2015
Farm Small World
We LOVE a small world at our house and I set them up regularly for Tommy and I to play with together or for Tommy to play with independently. They can sometimes take a long time to plan and set up and it can be a bit soul-destroying if your child plays with them for 5 minutes and then becomes disinterested. It makes you not want to bother again. Luckily for us, small worlds are always a hit with our four-year old. It's usually me that ends up begging to put it away after it's been set up for a week and begins to get in the way. A small world is something I can guarantee Tommy will play with for at least an hour at a time. And there are very few of his toys I could say that about. It is something he is very happy to play with, either with an adult or on his own.
We are huge fans of Schleich models in our house and I remember owning many as a child. They're so useful for imaginative play because they are a decent size, realistic and extremely hard-wearing. We already own a good collection of dinosaurs, wild animals and farm animals.
When it comes to small worlds, I try and plan something that makes use of items we already have, rather than buying new things. Because we had a large collection of farm animals and vehicles, it would be easy to create a farm small world.
For the landscape, I pretty much emptied the kitchen cupboards to see what I could find that might look like animal bedding. I eventually settled on porridge oats, red lentils, cornflakes, rice and spaghetti. I also used several shredded wheat for hay bales.
I then added green tissue paper to make fields, Lego fences, buildings and flowers. Several Lego animals also made an appearance too. I cut out a piece of foam and covered it in cling film to make it look like water and placed this in the centre of the tray to look like a pond.finally, I added the farm animals and several vehicle and it was ready!
This was such a hit with Tommy. He spent a long time feeding the animals and using the vehicles to carry out jobs around the farm. He used the tractors to move the materials around and invented scenarios involving the different animals. He had so much fun with it.
As with so many of our small worlds, we left this out for a few days, so it could be played with again and again. The only downside was that this small world was made out of edible materials; we went out only to come back and find the dog had eaten all of the cornflakes! :(
Subscribe to:
Posts (Atom)