Tuesday, 19 May 2015

Foil Painting

As a child, I loved nothing more than to sit down with a colouring book and some pencils or a pad of paper and just draw/colour away for hours on end. Whilst Tommy definitely looks like me, he certainly isn't like me in terms of the things he enjoys doing the most. He is just an outdoorsy kind of boy; he loves nothing more than running around the garden, playing football, chasing Daddy or the dog and just generally being active. Although he enjoys anything and everything, painting and drawing are probably his least favourite activities. Some people say it's a gender thing, others an age thing but I tend to see it as a personal thing - he's just not really as interested in doing it as he is other things. I am fine with this to an extent, but whilst I want to obviously try and do activities with him I know he will enjoy and not try and force him into doing them, it is important for him to draw and paint regularly to help with his fine motor skills and creative development. Therefore I do build regular opportunities for doing artwork into his time at home.

Whilst Tommy can read a huge number of high frequency words, 'read' numbers up to 100 and knows all of his sounds, he is more reluctant to write and it always feels like I'm pushing him to do it rather than encouraging him. We're trying lots of fun ways of getting him to write at the moment, most of which have been successful, so I really think that I multi-sensory/more practical approach is going to be the route to go down. With this in mind, I've been looking for lots of different ways we can incorporate mark/making and emerging writing into our play. 

We found the idea of foil-painting on Pinterest and thought it would be a good one to try with Tommy. To set it up, we placed long lengths of tin foil in a tuff tray and stuck them down using cellotape. I then drew lots of different patterns on individual coloured cards so that Tommy could practise drawing a range of different shapes. This provided him with a starting point and gave him a little inspiration as to the kinds of patterns he might create. Tommy is getting really good at copying shapes and patterns without having to trace. We used ordinary poster paint for this activity. I was a little worried about how quickly it would dry but it actually surprised me how little time it took. 


I pretty much expected this activity to last for just a few minutes - I always prepare myself for this when we paint or draw, knowing how little Tommy enjoys it. However, we managed to continue this activity for ages. It even warranted me to remove our piece of artwork and replace it with another blank foil canvas and there was a request to do it another day! 

We really enjoyed this activity and it would be lovely to do with a younger child too - the tin foil makes a lovely noise when it's painted on and it's a lovely surface to swirl the paint around on. Here is one of our masterpieces:




Tuesday, 12 May 2015

2D Spring Flower Suncatcher

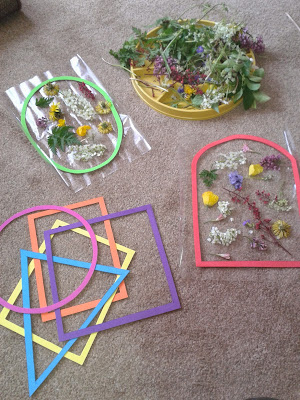
I recently shared with you our 3D Spring Flower suncatcher we made together. We had some flowers left over from doing this, so I decided we'd make a few 2D versions. To make them, you'll need some sticky-back plastic, some coloured card or foam and some Spring flowers/leaves/petals.

I started by cutting out some 2D shape outlines out of foam. You could use card for this but I felt foam was a bit thicker and less flimsy. I then cut out sections of sticky-backed plastic big enough to fit the outlines onto and then stuck them on.


Tommy then set about arranging his flowers and leaves on top, pressing them down firmly to ensure they stuck to the plastic. I then sealed the pieces of artwork by adding a layer of sticky-backed plastic on the top and cut off any excess.


Again, I'm really pleased with how these have turned out. They've really brightened up our window and I'm hoping because they're sealed they'll last a little longer than our 3D version. I'd kind of like them to be up on the window for a while!

3D Spring Flower Suncatchers

I have soooooo much love for the Spring season. Everything just seems to be bursting into life and so bright and colourful at the moment. It really is one of my favourite times of the year. We've been taking some time out from what we normally do over the last few weeks, after a difficult time we've had recently and we've been trying to take our mind off things by going out and enjoying the nicer weather. So I've been quite quiet and not posted much on here in the way of craft/play activities because we haven't really done much at all since Easter.

I've always seen it as really important for children to see beauty in what is around them and to appreciate nature. It's something I always try to instill in Tommy and I will aim to do the same with Isla. Life is usually ridiculously busy, with little time to stop and look at what is around where you live or work. Children are constantly surrounded by toys and technology and it's nice to get away from this now and again, to experience some quiet time, to appreciate the environment and reflect on how lucky we are to live where we live. I definitely want our children to value and appreciate everything, particularly the things in life that are 'free' rather than commodities. I want them to get as much (or perhaps more) out of a walk on the beach or in the woods as they would do if we were to take them to Alton Towers. If we 'sell' these things as exciting, they will see them as such.

With this in mind, I wanted to create something that was a reflection of everything that was going on in the environment around us, something that would draw attention to the changes that had been happening as we had entered the season of Spring. We decided on a walk to collect 'evidence' of Spring - buds, blooms, different colours, blossom, leaves, greenery, anything really that suggested growth or new life. We found a large bucket and took it on a local walk around the village, through the park and the woods to collect our materials. There were no rules as to what went in the bucket, as long as it wasn't picked or pulled off a plant/tree. It's been extremely windy here over the last few weeks, so it just wasn't necessary to resort to picking flowers. We did take a few petals or flowers off the plants in our own garden though.

I didn't imagine this walk would be quite the hit it turned out to be. I encouraged Tommy to find as many different colours as he possibly could because our aim was to create a beautiful, colourful piece of art, and it was a challenge he couldn't resist. I also encouraged him to try and find a range of different kinds of materials, from spiky ones to smooth ones, from large-flowered ones to small-flowered ones, from fern-like leaves to broad ones and this really motivated him. We talked about the different plant names as we came across them and I was surprised to learn how much Tommy knew already.


Once we had collected a variety of leaves, flowers, blossom and petals, we returned home and then looked for ideas as to what to do with them. On Pinterest, I stumbled upon the idea of producing a 3D suncatcher. It was the perfect idea for making a piece of art out of our natural materials so we set about making it immediately.

To make it, you need a small cardboard box, some sticky-backed plastic, a collection of natural materials and some paint (optional). The box needs to be quite strong if you intend to paint it like we did.

First of all, we cut an aperture out of each side of our suncatcher, leaving a centimetre border around the edges. We cut the top off the box and then painted it white to make it look a little more attractive. The next step was to stick the sticky-backed plastic, with the sticky side facing outwards, onto the inside of the box's sides. Then Tommy carefully placed his leaves and flowers onto the sticky-backed plastic. Some of the leaves/flowers stuck better than others. The best tip I can offer is that the smaller they are, the better they will stick to the plastic. Try to create interest by sticking a variety of plants onto each side. To finish the suncatcher off, you could then cover each side with a further piece of sticky-backed plastic, to sandwich in your flowers/plants and stop them from dropping off. We didn't bother with this step, as I felt it looked just right as it was.

I'm so pleased with how this project turned out. The suncatcher is just so beautiful - it captures the sunlight so wonderfully and looks as though every single tiny piece was carefully and perfectly-placed, even though in reality it was just whacked on! I love how very different it looks from each side.


 I know it won't last very long unfortunately, as the flowers will die quickly; I don't know if you could get around this by drying and pressing the flowers beforehand. But I shall enjoy having it on our windowsill in the meantime!


Wednesday, 6 May 2015

Farm Small World

We LOVE a small world at our house and I set them up regularly for Tommy and I to play with together or for Tommy to play with independently. They can sometimes take a long time to plan and set up and it can be a bit soul-destroying if your child plays with them for 5 minutes and then becomes disinterested. It makes you not want to bother again. Luckily for us, small worlds are always a hit with our four-year old. It's usually me that ends up begging to put it away after it's been set up for a week and begins to get in the way. A small world is something I can guarantee Tommy will play with for at least an hour at a time. And there are very few of his toys I could say that about. It is something he is very happy to play with, either with an adult or on his own.

We are huge fans of Schleich models in our house and I remember owning many as a child. They're so useful for imaginative play because they are a decent size, realistic and extremely hard-wearing. We already own a good collection of dinosaurs, wild animals and farm animals.

When it comes to small worlds, I try and plan something that makes use of items we already have, rather than buying new things. Because we had a large collection of farm animals and vehicles, it would be easy to create a farm small world.

For the landscape, I pretty much emptied the kitchen cupboards to see what I could find that might look like animal bedding. I eventually settled on porridge oats, red lentils, cornflakes, rice and spaghetti. I also used several shredded wheat for hay bales.


I then added green tissue paper to make fields, Lego fences, buildings and flowers. Several Lego animals also made an appearance too. I cut out a piece of foam and covered it in cling film to make it look like water and placed this in the centre of the tray to look like a pond.finally, I added the farm animals and several vehicle and it was ready! 

This was such a hit with Tommy. He spent a long time feeding the animals and using the vehicles to carry out jobs around the farm. He used the tractors to move the materials around and invented scenarios involving the different animals. He had so much fun with it. 


As with so many of our small worlds, we left this out for a few days, so it could be played with again and again. The only downside was that this small world was made out of edible materials; we went out only to come back and find the dog had eaten all of the cornflakes! :(

Blossom Tree Printing

We haven't been doing an awful lot craft-wise lately, as the weather's been so nice and we've been taking the opportunity to have some lovely days out instead. I've had all kinds of ideas for Spring-related projects but we're only just getting round to doing some of them. We made these beautiful blossom trees the other day and I was thrilled with how they turned out so I thought I'd share them with you all.

To make them, we cut a large piece of scrap wallpaper and then I painted a tree outline that filled the paper. We then pressed a 2 litre bottle into some pink and blue paint and pressed it onto the paper lots of times to make it look like blossom. Tommy really enjoyed doing this activity and it's so easy it could be done by a really young toddler.


We'll continue sharing our Spring projects with you. I'd love to hear your ideas for Spring crafts too. It really is such a lovely time of year - I'm enjoying all the beautiful colours and general prettiness it brings.